PART 1 – Introduction
🤖 When Your Cloud Server Becomes Someone Else’s Target
One of the biggest misconceptions about cloud security is that deploying a virtual machine inside Microsoft Azure automatically makes it safe.
Unfortunately, the Internet doesn’t work that way.
The moment your virtual machine receives a public IP address, it becomes visible to anyone on the Internet—including cybercriminals.
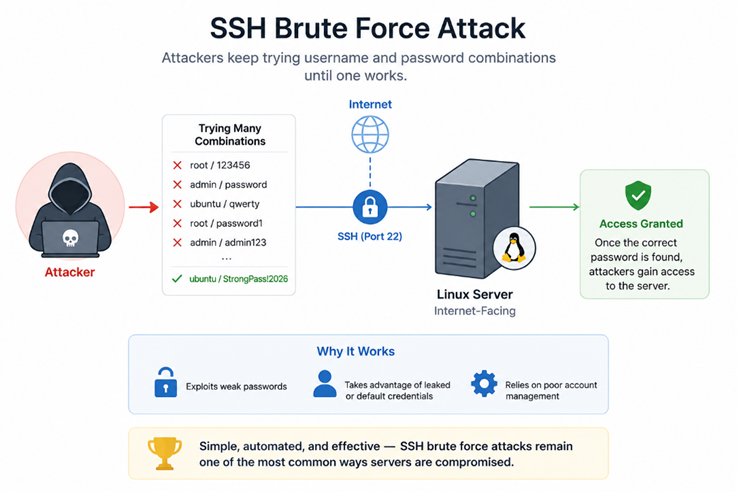
Every day, automated bots continuously scan cloud providers such as Microsoft Azure, AWS, and Google Cloud searching for vulnerable systems. Some attackers are looking for outdated software. Others search for exposed databases. But one of the most common targets remains surprisingly simple:
SSH login.
Unlike sophisticated zero-day attacks, SSH brute force attacks don’t rely on software vulnerabilities. Instead, they exploit weak passwords, leaked credentials, or poorly managed administrator accounts.
Attackers simply keep trying username and password combinations until one works.
It sounds primitive. Yet it’s still one of the most successful attack techniques against Internet-facing Linux servers.
🤖 Meet Microsoft Sentinel—Your Cloud SOC in the Sky
If Azure had a security control room, Microsoft Sentinel would be sitting right in the middle of it.
Sentinel is Microsoft’s cloud-native Security Information and Event Management (SIEM) and Security Orchestration, Automation, and Response (SOAR) platform.
That sounds like a lot of buzzwords.
Let’s translate it into plain English.
Imagine your company owns:
- 200 Azure Virtual Machines
- Microsoft 365
- Azure Firewall
- VPN Gateways
- Kubernetes clusters
- Windows Servers
- Linux Servers
- Palo Alto Firewalls
- Cisco Switches
Every device is generating logs.
Thousands.
Sometimes millions.
Every single day.
Now imagine asking one poor security engineer to read all those logs manually.
Good luck with that.
Microsoft Sentinel collects security events from all these systems into a single place, correlates related events, groups them into meaningful incidents, and helps security analysts focus on what actually matters. Even better, it can automatically respond to threats before anyone has time to grab another cup of coffee.
🧠 Wait… Doesn’t Sentinel AI Detect Everything?
This is probably the biggest misunderstanding about Microsoft Sentinel.
Many blog posts claim:
“Sentinel AI detects cyber attacks.”
Well…
That’s only part of the story.
Microsoft Sentinel is incredibly intelligent, but it doesn’t magically inspect every packet flowing through your virtual machine.
Instead, Sentinel acts as the brain of your Security Operations Center (SOC).
It collects alerts, correlates incidents, enriches them with additional information, and decides what should happen next.
The actual threat detection often comes from another Microsoft security product:
🛡️ Microsoft Defender for Cloud
Think of Microsoft Defender for Cloud as the security guard standing directly beside your virtual machine.
While Sentinel watches the entire city…
Defender watches your building.
It continuously monitors workloads running inside Azure and looks for suspicious behavior using:
- Behavioral Analytics
- Microsoft’s Global Threat Intelligence
- Machine Learning Models
- Security Baselines
- Continuous Risk Assessment
When Defender identifies something suspicious—such as reconnaissance activity—it generates a Security Alert.
That alert is then forwarded to Microsoft Sentinel.
Sentinel correlates it with other events, creates an Incident, and launches automated response workflows if necessary. This separation of responsibilities is exactly how Microsoft’s enterprise security ecosystem is designed.
⚡ So Why Use Both?
A simple comparison makes everything much easier to understand.
| Microsoft Defender for Cloud | Microsoft Sentinel |
| Protects workloads | Protects the entire organization |
| Detects threats | Investigates incidents |
| Monitors Azure resources | Collects logs from hundreds of systems |
| Generates Security Alerts | Correlates multiple alerts into incidents |
| Focuses on workload protection | Focuses on SOC operations |
| Uses behavioral analytics | Uses SIEM + SOAR automation |
Rather than replacing each other, the two products complement one another.
One detects.
The other orchestrates. Together, they dramatically reduce the time between detection and response.
🎯 What You’ll Learn
In this hands-on lab, you’ll learn how to:
- Deploy a Linux virtual machine protected by Microsoft Defender for Cloud.
- Enable Microsoft Defender for Servers Plan 2.
- Configure Microsoft Sentinel as the central SIEM platform.
- Simulate a real SSH brute force attack using Hydra.
- Observe how Microsoft Defender for Cloud generates a Security Alert.
- Convert the alert into a Microsoft Sentinel Incident.
- Trigger an Automation Rule automatically.
- Execute an Azure Logic App to update the Network Security Group.
- Block the attacker’s public IP address automatically.
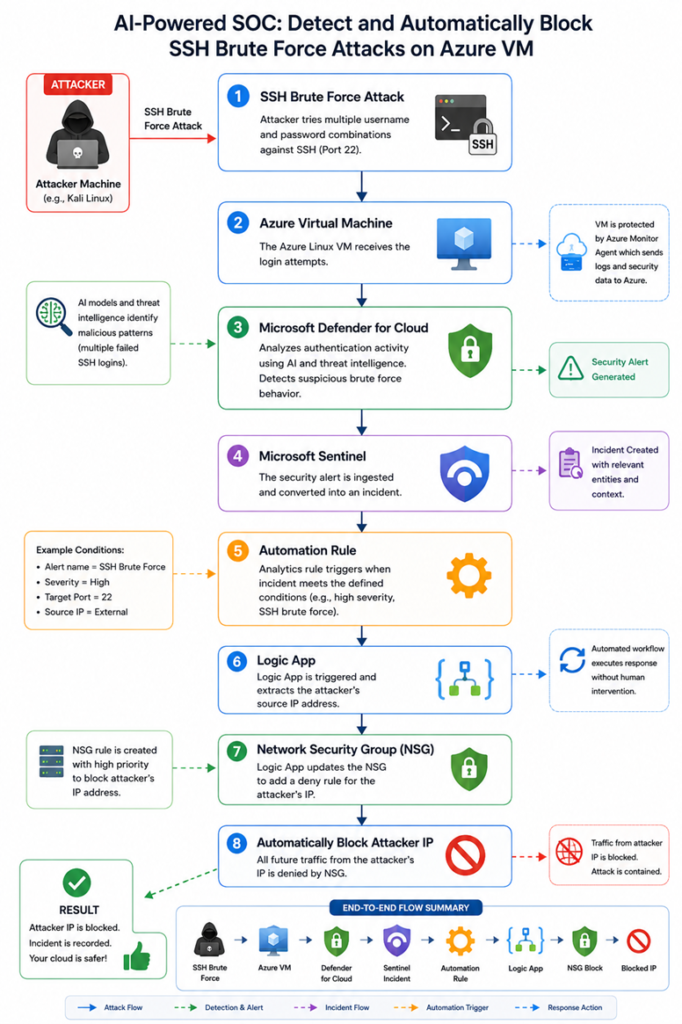
Part 2 – Understanding the AI-Powered Security Workflow
This is where the first layer of intelligence comes into play.
Many people believe Microsoft Sentinel performs all AI-based threat detection.
In reality, Microsoft Defender for Cloud is responsible for analyzing workload behavior and generating high-confidence security alerts.
Rather than inspecting individual packets, Defender evaluates activity over time using multiple detection technologies, including:
- Behavioral Analytics
- Machine Learning
- Microsoft Global Threat Intelligence
- Security Baselines
- Cloud-scale Detection Models
Instead of asking:
“Is this packet malicious?”
Defender asks much smarter questions:
- Has this IP attempted to connect to an unusually large number of ports?
- Does the scanning pattern resemble known reconnaissance behavior?
- Has Microsoft observed similar activity elsewhere?
- Is the source IP associated with malicious activity?
If the answer is yes, Defender generates a Security Alert. This alert becomes the starting point of our automated response workflow.
🚨 Microsoft Sentinel Creates an Incident
Once Defender for Cloud generates a Security Alert, the alert is automatically forwarded to Microsoft Sentinel.
At this stage, Sentinel isn’t trying to determine whether the activity is malicious—that decision has already been made by Defender.
Instead, Sentinel focuses on understanding the bigger picture.
It enriches the alert with additional context, including:
- Source IP Address
- Target Azure Resource
- Subscription
- Resource Group
- Alert Severity
- MITRE ATT&CK Techniques
- Timeline
- Related Entities
If multiple alerts are related to the same attack, Sentinel intelligently groups them into a single Incident.
This dramatically reduces alert fatigue and gives security analysts a complete view of the attack rather than dozens of disconnected alerts.
🧠 Where Does Microsoft Sentinel AI Actually Help?
This is probably the most misunderstood part of Microsoft Sentinel.
Many articles simply say:
“Sentinel AI detects attacks.”
That isn’t entirely accurate.
Microsoft Sentinel applies AI after alerts are generated.
Its AI capabilities help security analysts by:
- Correlating multiple alerts into a single incident
- Identifying relationships between users, devices, IP addresses, and Azure resources
- Prioritizing incidents based on severity and risk
- Mapping attacker behavior to the MITRE ATT&CK framework
- Building Investigation Graphs
- Reducing false positives through contextual analysis
Without intelligent correlation, a SOC analyst might see four separate alerts.
Microsoft Sentinel recognizes that these activities belong to the same attack and presents them as a single investigation.
That’s where Sentinel’s intelligence adds tremendous value.
⚙️ Automation Rules Decide What Happens Next
Detection alone isn’t enough.
The next question is:
“What should we do now?”
This is the responsibility of Automation Rules.
Automation Rules act like traffic controllers.
They evaluate incoming incidents and determine whether an automated response should be triggered.
For example:
- Alert Source = Microsoft Defender for Cloud
- Alert Severity = High
- Incident Status = New
If these conditions are met, Sentinel automatically launches a predefined Playbook. This ensures that security responses happen consistently without relying on someone manually reviewing every incident.
🔄 Azure Logic Apps Executes the Response
The Playbook in our lab is built using Azure Logic Apps.
Think of a Logic App as a workflow engine.
Instead of writing hundreds of lines of code, we simply connect Azure services together.
Our workflow performs the following actions:
- Retrieve the source IP address from the Sentinel incident.
- Verify that the IP isn’t part of an approved allow list.
- Update the Network Security Group protecting the Azure VM.
- Create a new inbound Deny rule for the attacker’s IP address.
- Record the action for auditing and future investigation.
This entire process can complete in just a few seconds.
Finally, Azure Logic Apps updates the Network Security Group (NSG).
A new high-priority inbound rule is created to deny traffic originating from the suspicious IP address.
Part 3 – Building the Azure Lab Environment
Now comes the fun part—it’s time to build our lab.
Fortunately, the environment for this tutorial is surprisingly simple.
We don’t need dozens of Azure services or an expensive enterprise subscription. A single virtual machine with a public IP address is enough to demonstrate how Microsoft Defender for Cloud and Microsoft Sentinel work together to detect suspicious activities and automate incident response.
By the end of this section, we’ll have a fully functional Azure environment ready for the security configuration in the next parts.
A/Deploy the Azure Lab Environment
Let’s begin by preparing the infrastructure.
Since deploying an Azure Virtual Machine is a basic Azure task, this section intentionally keeps the deployment concise.
Create a new Ubuntu virtual machine using your preferred Azure region.
| Setting | Recommended Value |
| Image | Ubuntu Server 24.04 LTS |
| Size | Standard B2s |
| Authentication | SSH Public Key |
| Public IP | Standard (Static) |
| Network Security Group | Basic |
| Virtual Network | Create New |
🌍 Configure the Network Security Group
For this demonstration, expose only the services that are actually required.
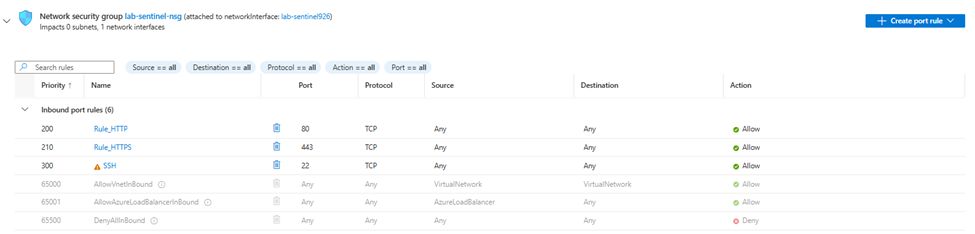
Avoid exposing unnecessary services. Even in a lab environment, minimizing the attack surface is always a good security practice.
B/Enable Microsoft Defender for Cloud
Now we arrive at the first truly important component of our security architecture.
Many people assume Microsoft Sentinel is responsible for detecting attacks.
In reality, Microsoft Defender for Cloud performs the initial workload analysis and generates the security alerts that Microsoft Sentinel later investigates and automates.
Think of Defender for Cloud as the security guard standing next to your server, while Microsoft Sentinel acts as the security operations center coordinating the entire response.
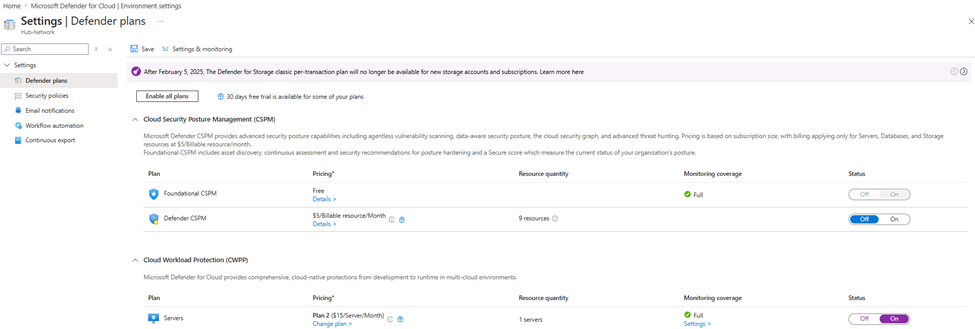
Step: Azure Portal → Microsoft Defender for Cloud → Environment settings
Select your Azure subscription.
Open the Defender plans page.
Locate Servers and switch the plan to Defender for Servers Plan 2.
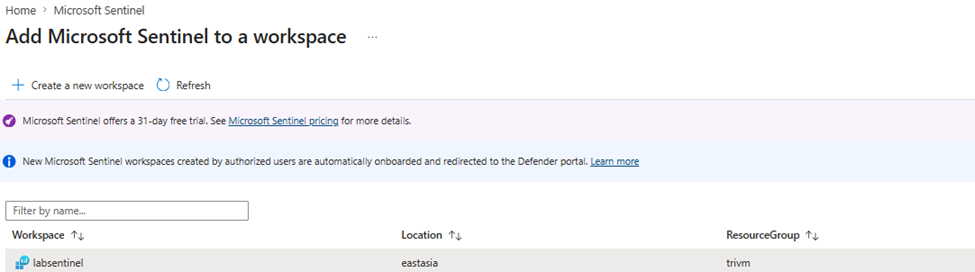
C/Enable Microsoft Sentinel
Navigate to:
Azure Portal → Microsoft Sentinel
Select Create.
Choose the Log Analytics Workspace you created earlier.
Click Add.
That’s it. Microsoft Sentinel is now attached to the workspace and ready to ingest security data.
Why does Sentinel require a Log Analytics Workspace?
Think of Log Analytics Workspace as a giant security database.
Every security event, performance metric, security alert, and monitoring log eventually ends up here. Microsoft Sentinel doesn’t replace Log Analytics.
D/Connect Microsoft Defender for Cloud to Microsoft Sentinel
Now it’s time to connect our two security platforms.
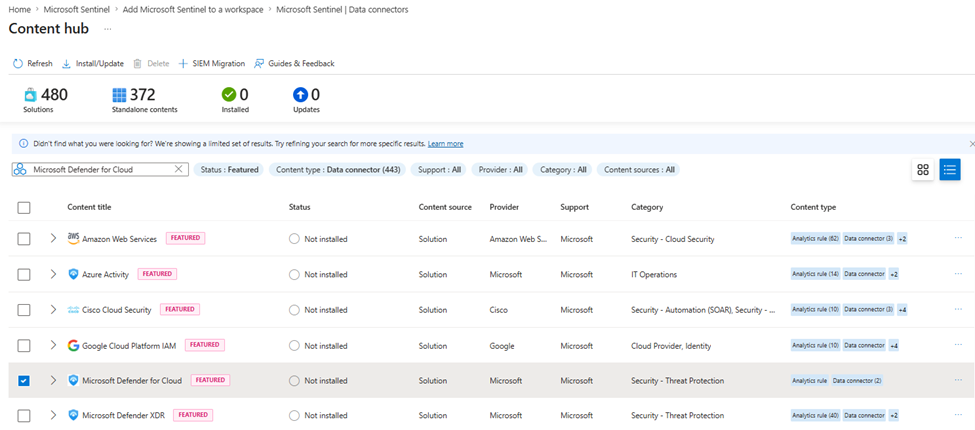
Open Microsoft Sentinel and navigate to:
Configuration → Data connectors
Search for:
Microsoft Defender for Cloud If the solution isn’t available yet, install the Microsoft Defender for Cloud solution from the Content Hub first, then return to Data connectors and open the connector page.
E/Verify Microsoft Defender Protection
After enabling Microsoft Defender for Servers Plan 2, Azure automatically provisions the required security components on protected virtual machines.
Depending on the operating system and tenant configuration, the deployed extension may differ.
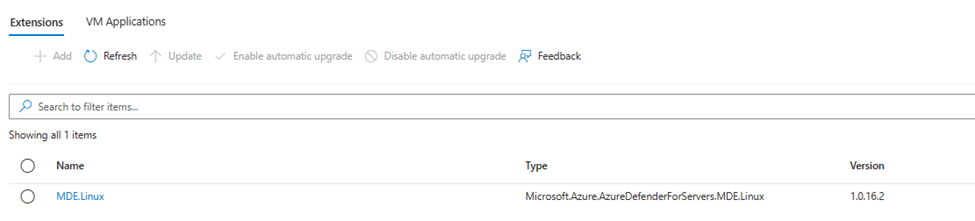
For Linux virtual machines, you’ll typically see the Microsoft Defender for Endpoint (MDE) extension.
Navigate to your virtual machine.
Open:
Extensions + Applications
Verify that the MDE.Linux extension has been successfully provisioned.
Why Is This Extension Important?
Once Microsoft Defender for Servers Plan 2 is enabled, Azure automatically deploys the Microsoft Defender for Endpoint extension to supported virtual machines.
Rather than simply acting as an antivirus solution, MDE continuously collects security telemetry from the operating system, including authentication activities, process execution, network connections, and many other security-related events.
These signals are analyzed by Microsoft’s cloud-based security platform, where they are correlated with behavioral analytics, machine learning models, and Microsoft Threat Intelligence.
When suspicious activity is identified, Microsoft Defender for Cloud generates a high-confidence Security Alert, which can then be consumed by Microsoft Sentinel for investigation and automated response.
Without a healthy MDE deployment, Microsoft Defender for Cloud has significantly less visibility into what’s happening inside the virtual machine.
F/Validate Microsoft Defender Protection
Before moving on to the attack simulation, let’s verify that Microsoft Defender is actually protecting the virtual machine. SSH into the Linux server and run the following command:
# mdatp healthA healthy deployment should return output similar to the following:
healthy : true
licensed : true
cloud_enabled : true
definitions_status : up_to_date
These values confirm that Microsoft Defender is properly licensed, connected to Microsoft’s cloud services, and using the latest security intelligence.
Part 4 – Simulating a Real SSH Brute Force Attack
So far, we’ve built the security infrastructure.
Microsoft Defender for Cloud is protecting our Azure virtual machine.
Microsoft Sentinel is ready to receive security alerts.
Now comes the exciting part.
Instead of generating fake events or importing sample logs, we’ll perform a controlled attack against our own Azure virtual machine.
This approach allows us to observe how Microsoft’s security platform behaves in a real-world scenario.
A/Preparing the Attacker Machine
Any Linux machine capable of running Hydra can be used.
For this demonstration, we’ll use Kali Linux, although Ubuntu, Parrot OS, or even WSL on Windows will work equally well. Verify that Hydra is installed.
hydra -hIf Hydra isn’t installed: On Ubuntu install this tool using command:
sudo apt update
sudo apt install hydra -y
(Kali Linux already includes Hydra by default)
💡 Why Hydra?
Hydra is one of the world’s most widely used password auditing tools.
Security professionals use it to verify password policies.
Unfortunately, attackers use the exact same tool to automate password guessing attacks against Internet-facing services.
Because of its popularity, Hydra provides an excellent way to simulate realistic attack behavior in a controlled lab.
B/Creating a Small Password List
For ethical reasons, we don’t need millions of passwords.
A short wordlist is sufficient to generate repeated failed login attempts.
Create a file named:
passwords.txt
Example:
password123
welcome
admin
qwerty
abcxyzqwe
123456
Admin@123
root@123
testing@123
password
This list intentionally contains incorrect passwords.
We are not attempting to compromise the server. We simply want multiple failed authentication attempts.
C/Launching the SSH Brute Force Simulation
Now we’re ready to simulate the attack. Run the following command:
hydra \
-l root \
-P passwords.txt \
-t 10 \
-f \
ssh://<Azure_VM_Public_IP>
What Happens Behind the Scenes?
Hydra repeatedly attempts to authenticate using different passwords.
Every failed login generates an authentication event on the Linux server.
Microsoft Defender for Endpoint collects endpoint telemetry.
Microsoft Defender for Cloud correlates these events with cloud intelligence and behavioral analytics.
If the activity matches Microsoft’s detection logic, a Security Alert will eventually be generated.
Unlike traditional intrusion detection systems, Defender doesn’t react to every failed login.
Instead, it evaluates the overall behavior before deciding whether the activity represents an actual attack.
Part 5 – AI Detects the Attack
Our simulated attack has finally reached the stage where Microsoft’s security intelligence recognizes the behavior as suspicious.
After several failed SSH authentication attempts generated by Hydra, Microsoft Defender for Cloud automatically analyzed the endpoint telemetry and produced a security alert.
This is the exact moment where Microsoft’s cloud-native AI begins protecting our environment.
Unlike traditional intrusion detection systems that simply count failed login attempts, Microsoft Defender evaluates authentication behavior using multiple cloud-scale signals before deciding whether the activity represents a genuine attack.
A/Viewing the Security Alert
Open the Azure Portal and navigate to:
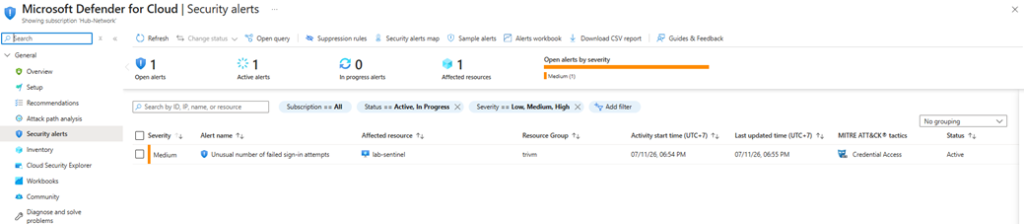
This confirms that Microsoft Defender has identified the authentication activity as abnormal.
Notice that the alert wasn’t created immediately after the first failed login.
Instead, Defender waited until it had collected enough evidence to confidently classify the activity as suspicious. This significantly reduces false positives caused by administrators accidentally entering an incorrect password
B/Investigating the Alert
Click the alert to open the details page.
Spend a few minutes reviewing the information provided.
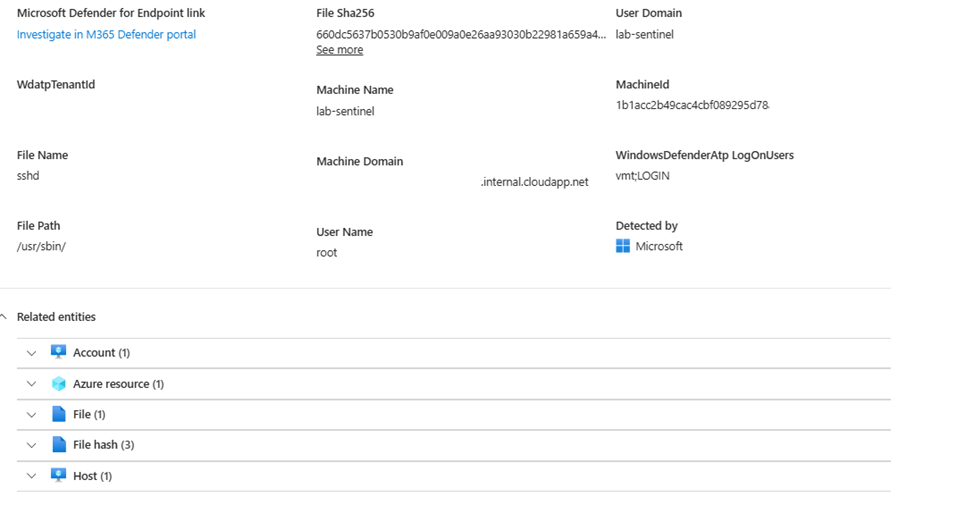
One of the most useful sections is Entities.
Here, Defender links together the objects involved in the incident.
Typical entities include:
- Azure Virtual Machine
- Source IP Address
- User Account
- Azure Subscription
These entities become extremely valuable once Microsoft Sentinel begins correlating multiple alerts into a single security incident.
Part 6 – Transforming Security Alerts into Automated Security Incidents
So far, Microsoft Defender for Cloud has successfully identified our SSH brute force attack and generated a Security Alert.
For many organizations, this is where the investigation begins.
A security analyst opens the alert, reviews the evidence, determines the attacker’s IP address, and manually blocks the source.
That approach works…
…until your organization starts receiving hundreds or even thousands of security alerts every day.
Manual investigation quickly becomes impossible.
This is exactly why Microsoft Sentinel exists.
Instead of treating each alert as an isolated event, Sentinel collects alerts from multiple security products, correlates related activities, enriches them with additional context, and creates a single security incident that can trigger automated response workflows.
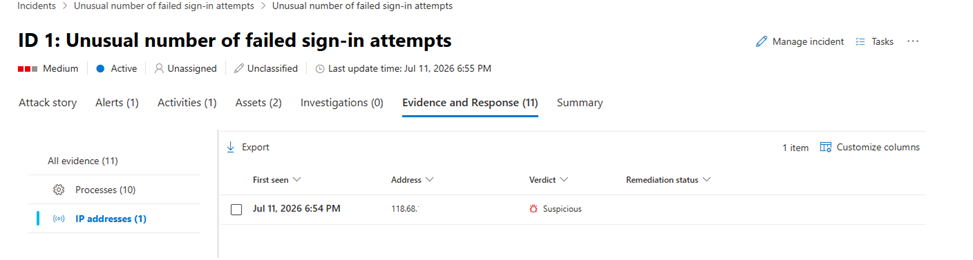
In this lab, Microsoft Sentinel will automatically convert the Defender alert into an Incident, which will later trigger a Logic App responsible for blocking the attacker’s public IP address.
From Microsoft Sentinel, navigate to:
Threat Management → Incidents > Click here to go to the Defender portal
Part 7 – Building an Automation Rule for Automatic Incident Response
At this stage, Microsoft Defender has already completed its job.
The SSH brute force attack has been detected.
A unified Security Incident has been created automatically inside the Microsoft Defender Portal.
However, one important problem still remains.
Although Microsoft successfully identified the attacker, the attacker can still continue sending SSH requests to our virtual machine.
Someone must respond to the incident.
In many organizations, this responsibility falls on a SOC analyst who manually reviews the incident, identifies the attacker’s IP address, logs into Azure, modifies the Network Security Group, and blocks the malicious source.
That process works.
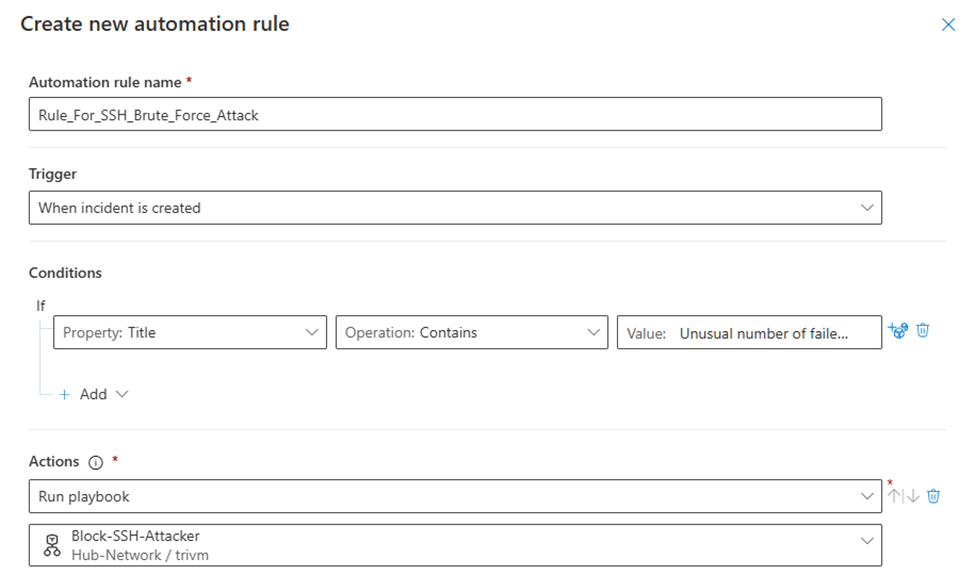
Navigate to:
Microsoft Sentinel > Automation > Automation Rules
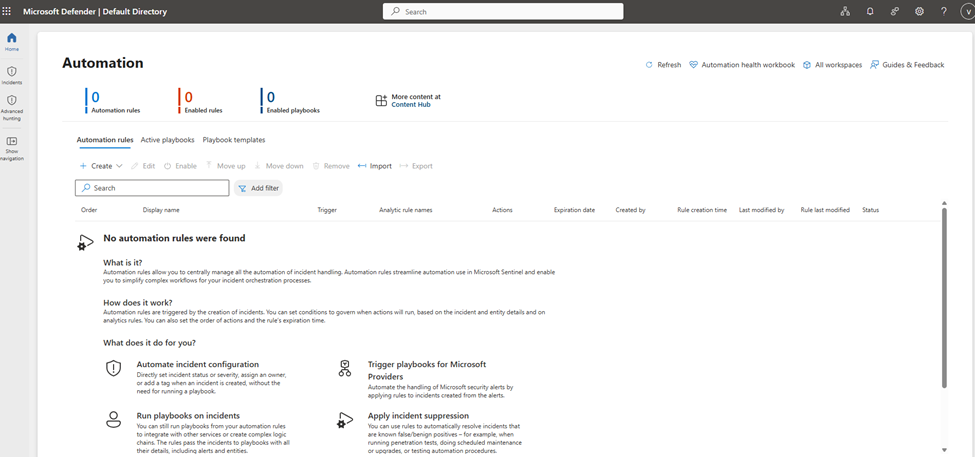
Create > Automation Rule
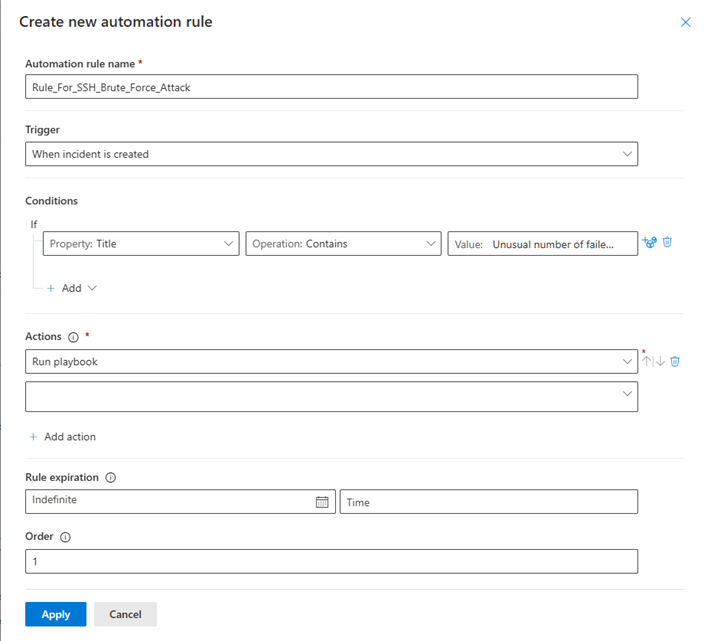
At this moment you won’t see any playbooks yet.
That’s perfectly normal.
We haven’t created the Logic App. Leave the action temporarily empty, or return after completing Part 7.
Part 8 – Building the Playbook That Automatically Blocks the Attacker
Up to this point, Microsoft Defender has successfully detected the SSH brute force attack, and Microsoft Sentinel has created a unified Security Incident.
However, the attacker can still reach our virtual machine.
Detection alone doesn’t stop an attack.
A Security Operations Center becomes truly effective only when detection is immediately followed by response.
This is exactly where Azure Logic Apps come into play.
In Microsoft Sentinel, a Logic App used for incident response is commonly referred to as a Playbook.
A playbook is simply an automated workflow that performs one or more actions whenever Microsoft Sentinel decides a response is required.
In our lab, the playbook will automatically retrieve the attacker information from the Incident and update the Azure Network Security Group (NSG), preventing any further SSH connections from the malicious IP address.
A/Creating a New Logic App
Create a resource > Logic App > Logic App (Consumption)
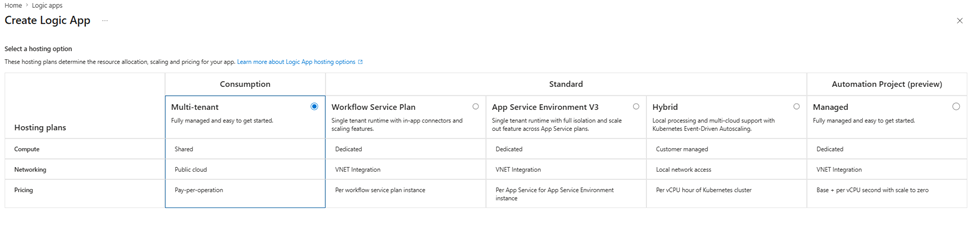
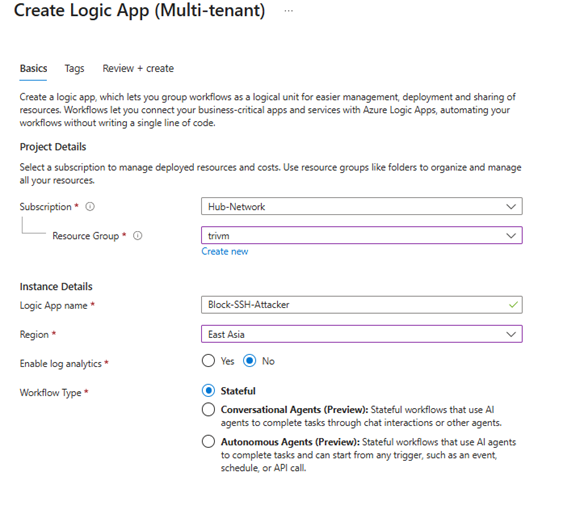
Open the Logic App Designer. > Add the first trigger > Microsoft Sentinel Incident Trigger
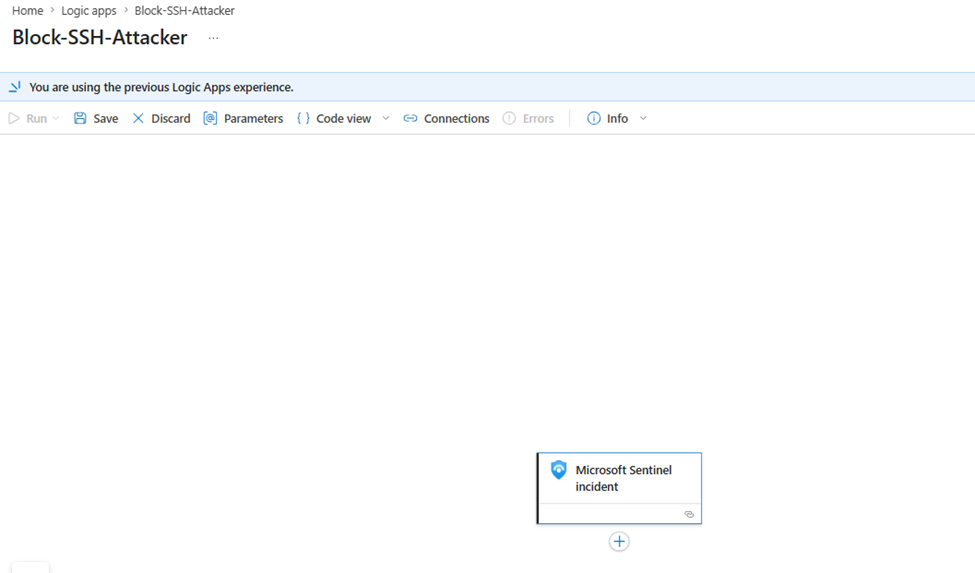
Click the + button beneath the trigger.
Choose: Data Operations > Select: Compose
nside the Inputs box, switch to the Expression tab.
Enter:
triggerBody()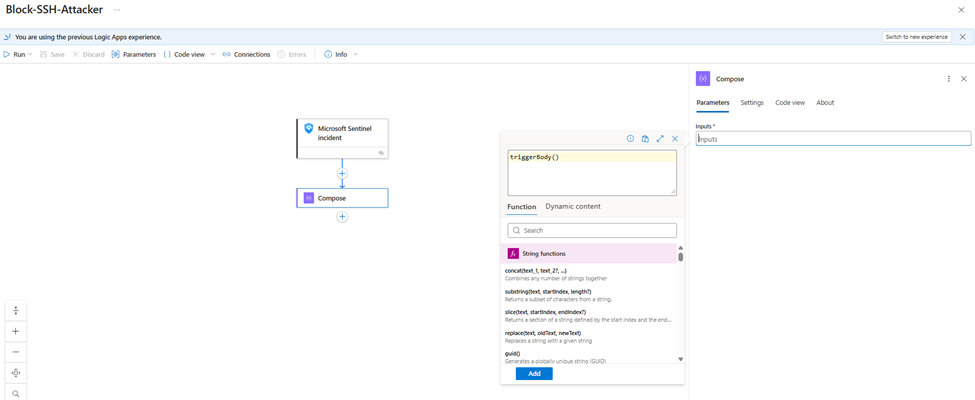
The Compose action now stores the complete payload received from Microsoft Sentinel.
Click Save.
At this point the playbook is ready.
However, it won’t execute until Microsoft Sentinel calls it.
The next step is to connect the playbook to an Automation Rule
Now that our Logic App has been created, it’s time to connect it to the Automation Rule we configured in Part 6.
Remember that the Automation Rule is responsible for deciding when the playbook should run, while the Logic App defines what actions should be performed.
Return to:
Microsoft Sentinel > Automation > Automation Rules
Open the Automation Rule created earlier.
Under the Actions section, locate the Run playbook action.
Click Select Playbook, then choose the Logic App we created in this part.
B/Validate the Playbook Trigger and Inspect the Incident Payload
Before adding any response actions, it’s a good practice to verify that Microsoft Sentinel can successfully trigger the playbook and that the expected Incident data is available.
Launch another SSH brute force attack against the Azure virtual machine using Hydra.
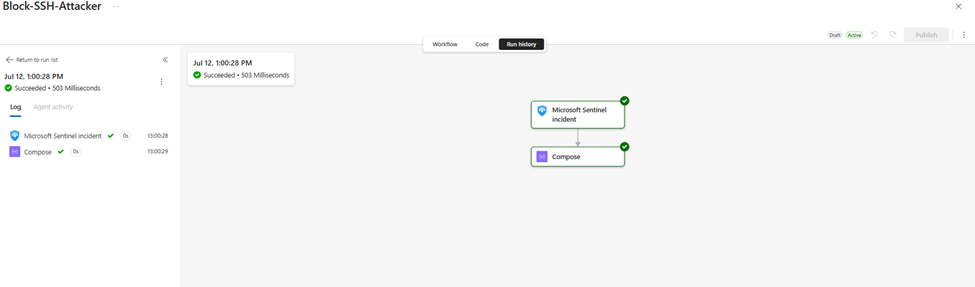
Once Microsoft Defender for Cloud generates a new security alert and Microsoft Sentinel creates a corresponding Incident, the Automation Rule should automatically invoke the Logic App.
Navigate to:
Logic App
Overview
Runs history
A successful execution should appear automatically.
Open the most recent run.
Inspect the Trigger Payload
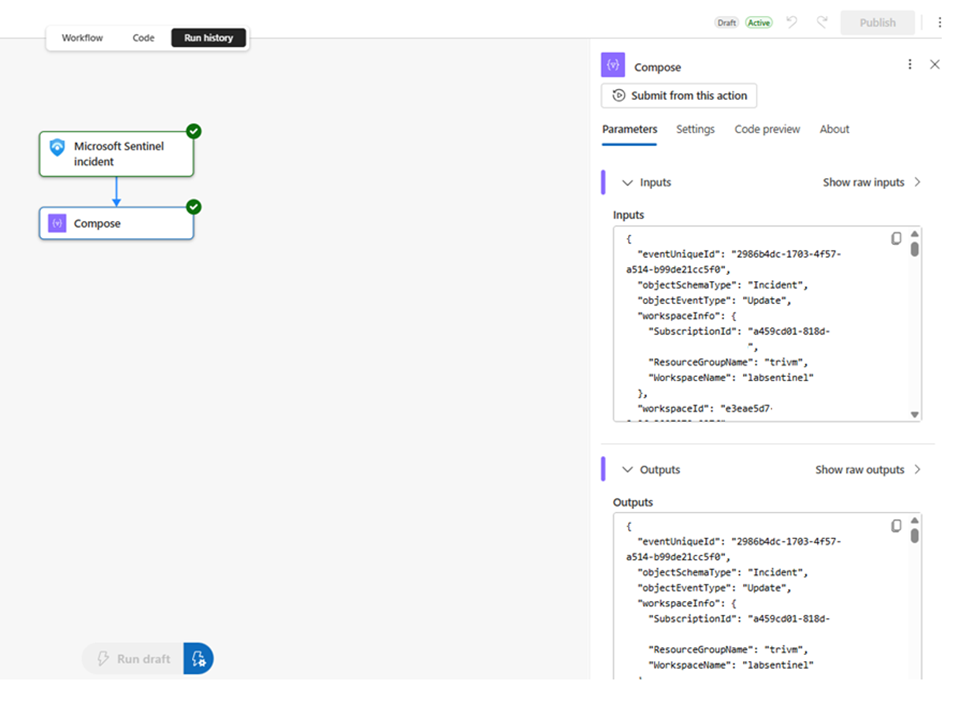
Expand the Compose action (or the action used to display the trigger body) > Show raw outputs
The output should contain the complete Microsoft Sentinel Incident payload.
This payload includes valuable information such as:
- Incident information
- Alert details
- Severity
- MITRE ATT&CK tactics
- Related entities
- Host information
- User accounts
- IP addresses
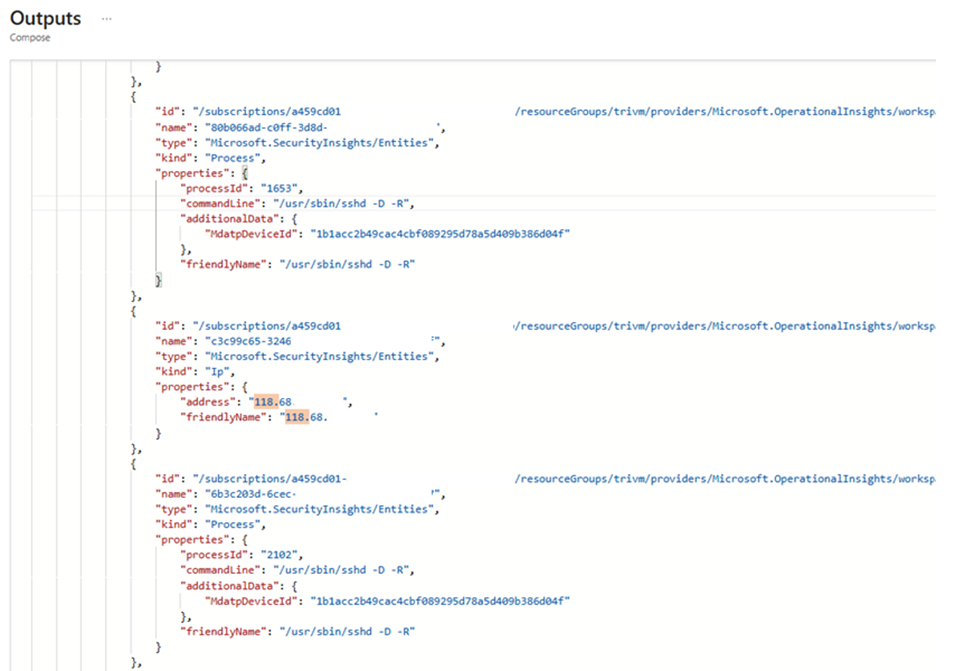
This is the IP address that will later be extracted by the playbook and automatically added to the Azure Network Security Group (NSG) block list.
Part 8 – Automatically Blocking the Attacker by Updating Azure NSG
At this point, our playbook is successfully triggered whenever Microsoft Sentinel creates a new Incident.
The next objective is to automatically extract the attacker’s public IP address from the Incident payload and immediately update the Azure Network Security Group (NSG) to block any further SSH connections.
Instead of relying on external APIs, the Microsoft Sentinel Incident trigger already provides all related entities, including hosts, user accounts, processes, files, hashes, and IP addresses.
This significantly simplifies the automation workflow.
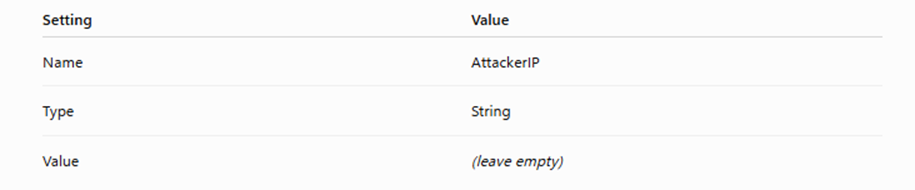
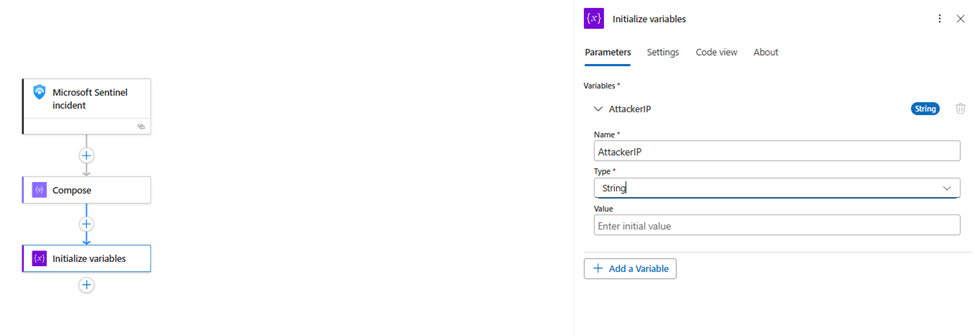
A/Initialize a Variable
Since the attacker IP will be used later when creating the NSG rule, we’ll first store it in a variable.
Add a new action: Variables > Initialize variable
B. Iterate Through the Related Entities
Add another action: Control > For each
For Select an output from previous steps, use the following expression:
triggerBody()?['object']?['properties']?['relatedEntities']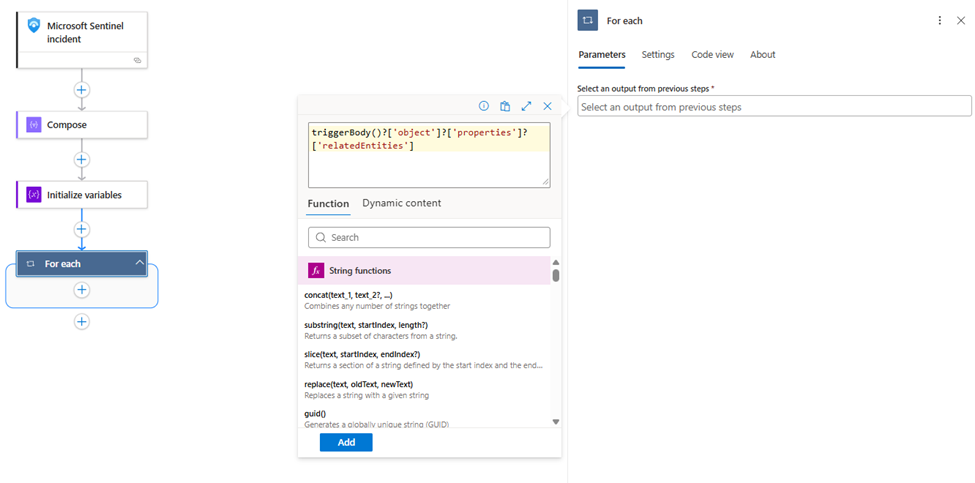
C. Identify the Attacker IP Address
The Microsoft Sentinel incident contains multiple related entities. Depending on the attack, these entities may include the affected virtual machine, user account, running process, files, IP addresses, and other security artifacts.
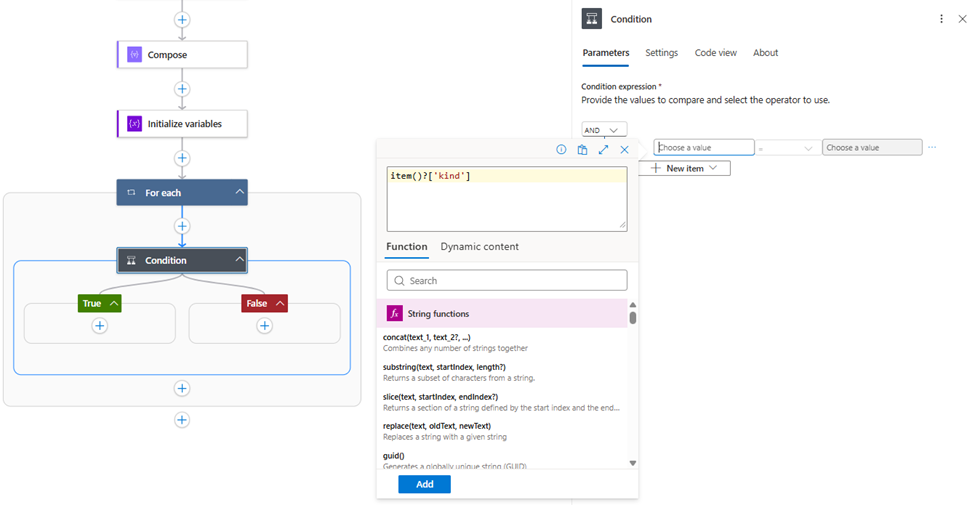
Since our objective is to block the attacker, the Logic App must first determine which entity represents an IP address.
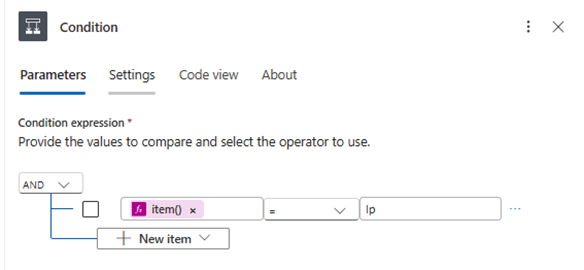
Inside the For each loop, add a Condition action
Left Value (Expression)
item()?['kind']Operator
=Right Value
IpThe completed condition should look similar to the following.
D. Store the Attacker IP Address
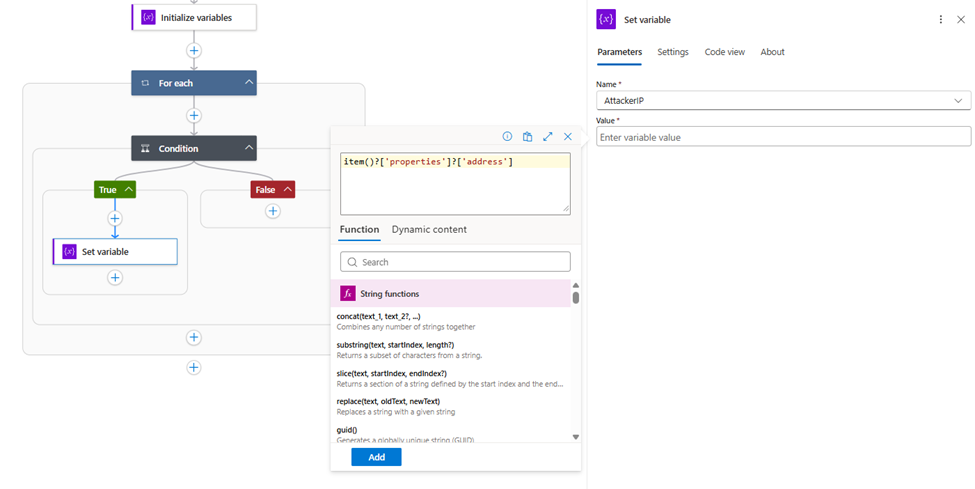
When the condition evaluates to True, the current entity is confirmed to be an IP address.
Next, add a Set variable action inside the True branch.
Configure the action as follows.
E. Create the Network Security Group Rule
At this point, the Logic App has successfully extracted the attacker’s public IP address from the Microsoft Sentinel incident.
The final step is to automatically block future SSH connections originating from that IP address.
Although Azure Logic Apps provides several methods to interact with Azure resources, directly updating a Network Security Group (NSG) using the Azure Resource Manager connector can be inconsistent across different Azure tenants due to connector limitations and API metadata issues.
Instead, we’ll use an Azure Automation Runbook to perform the infrastructure change. This approach is more reliable, easier to maintain, and closely resembles how many enterprise organizations implement SOAR playbooks in production.
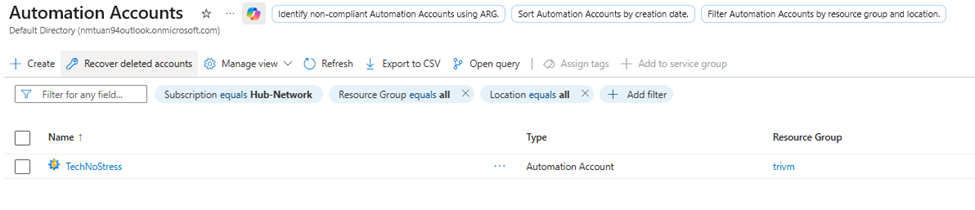
Create an Azure Automation Account
Azure Portal → Automation Accounts → Create
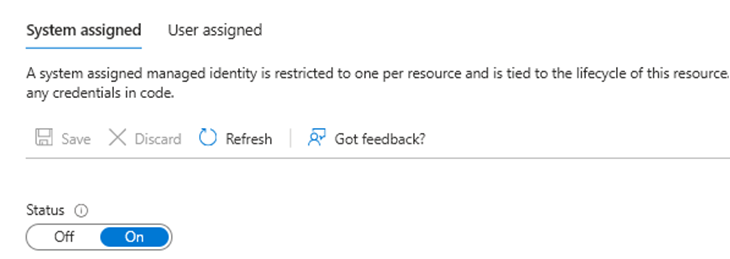
Enable the System Assigned Managed Identity
Automation Account → Identity > Enable: System Assigned
Grant Permissions to Update the NSG
Resource Group → Access Control (IAM) → Add Role Assignment
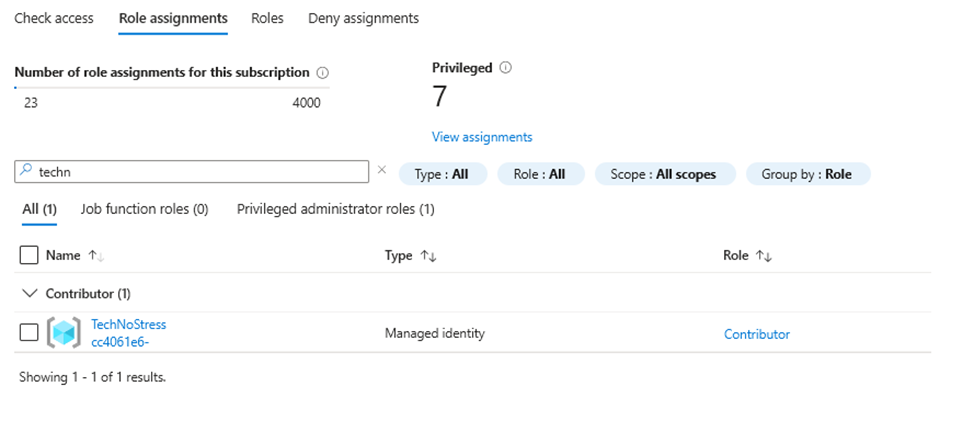
Create the PowerShell Runbook Automation Account → Runbooks → Create Runbook
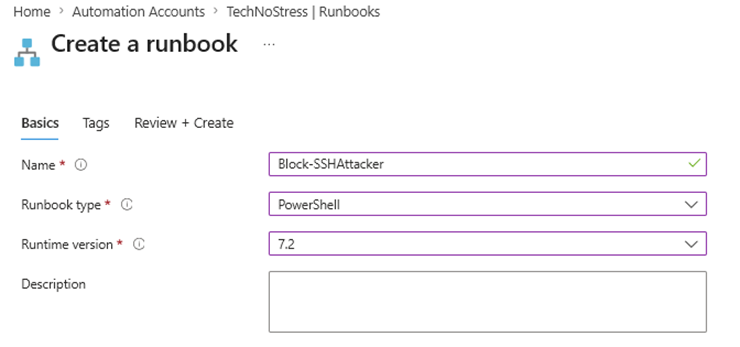
At the beginning of the Runbook, define the parameters that will be received from the Logic App.
The Logic App only passes the attacker’s public IP address. Add the following parameter at the beginning of the Runbook.
param(
    [Parameter(Mandatory = $true)]
    [string]$AttackerIP
)
Since the lab always protects the same virtual network, the remaining infrastructure information can be defined directly inside the script.
$ResourceGroup = "<rs name>"
$VirtualNetwork = "<VNet name>"
$SubnetName = "<subnet name>"
Full PS Runbook:
param(
    [Parameter(Mandatory = $true)]
    [string]$AttackerIP
)

$ResourceGroup = "<rs name>"
$VirtualNetwork = "<vnet name>"
$SubnetName = "<subnet name>"
Connect-AzAccount -Identity
$vnet = Get-AzVirtualNetwork -ResourceGroupName $ResourceGroup -Name $VirtualNetwork
$subnet = $vnet.Subnets | Where-Object {
    $_.Name -eq $SubnetName
}

$nsgId = $subnet.NetworkSecurityGroup.Id

$nsgName = Split-Path $nsgId -Leaf

$nsg = Get-AzNetworkSecurityGroup `
    -ResourceGroupName $ResourceGroup `
    -Name $nsgName

Add-AzNetworkSecurityRuleConfig `
    -Name "Block-$($AttackerIP.Replace('.', '-'))" `
    -NetworkSecurityGroup $nsg `
    -Priority 100 `
    -Direction Inbound `
    -Access Deny `
    -Protocol Tcp `
    -SourceAddressPrefix $AttackerIP `
    -SourcePortRange * `
    -DestinationAddressPrefix * `
    -DestinationPortRange 22
Set-AzNetworkSecurityGroup -NetworkSecurityGroup $nsg
Click Publish to make the Runbook available.
The Azure Automation Runbook is now ready to receive requests from Azure Logic Apps.
The Azure Automation Runbook is now ready to receive requests.
In this section, we’ll modify the Logic App so that every Microsoft Sentinel incident automatically starts the Runbook and passes the attacker’s public IP address as an input parameter.
Locate the end of the workflow, immediately after the For each loop has completed and True condition > Add an action > Azure Automation
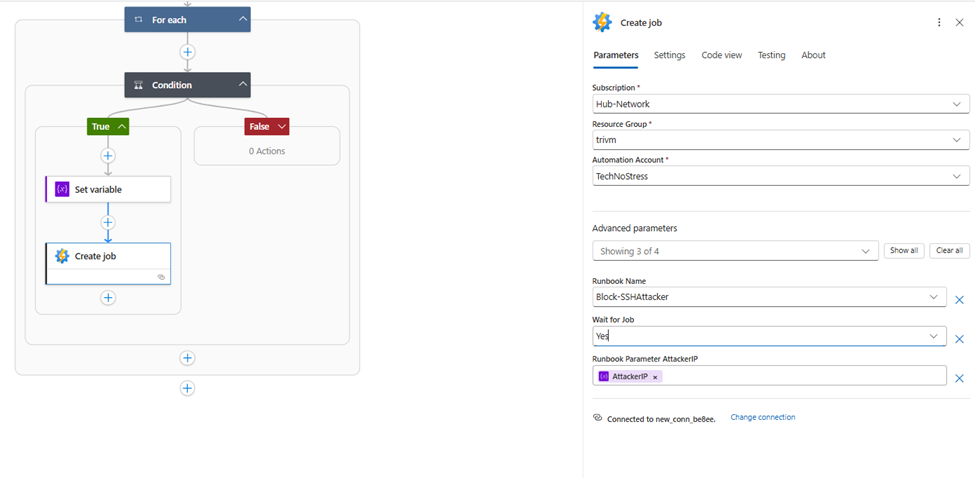
Part 9 – Validating the End-to-End Automated Response
At this point, the entire SOAR workflow has been completed.
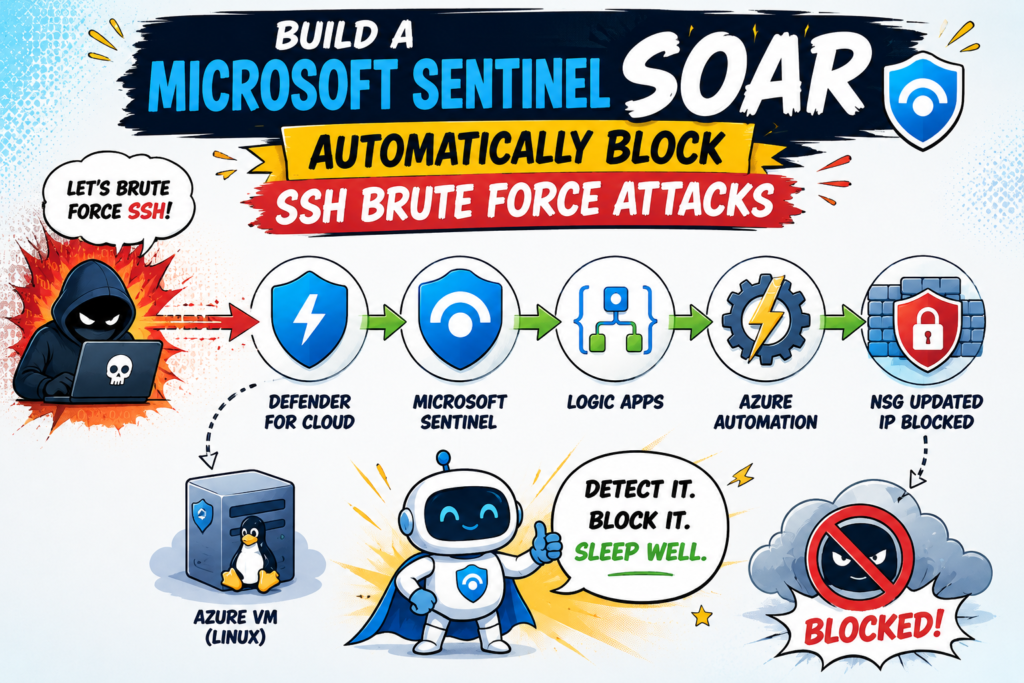
Microsoft Defender for Cloud detects the SSH brute-force attack, Microsoft Sentinel creates an incident, the Logic App extracts the attacker’s IP address, Azure Automation executes the PowerShell Runbook, and Azure updates the Network Security Group to block future SSH connections from the malicious source.
In this final section, we’ll verify that every component of the automation pipeline executed successfully.
A/Launch Another SSH Brute-Force Attack
From the attacker machine, execute the Hydra command again using the same target VM.
hydra -l root -P passwords.txt ssh://<Azure-VM-Public-IP>Allow the attack to continue until Microsoft Defender for Cloud detects the abnormal authentication activity.
B/Verify the Microsoft Sentinel Incident
After several minutes, open the Microsoft Defender portal.
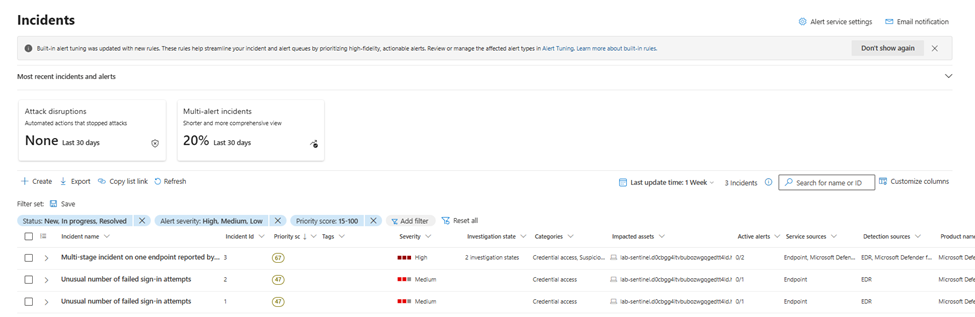
C/Verify the Logic App Execution and the Network Security Group
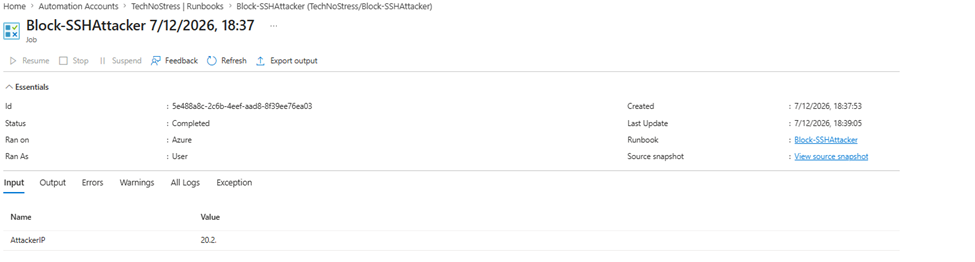
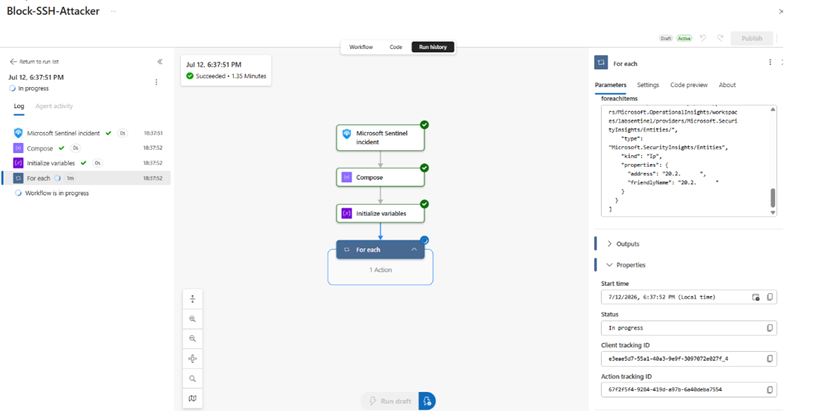
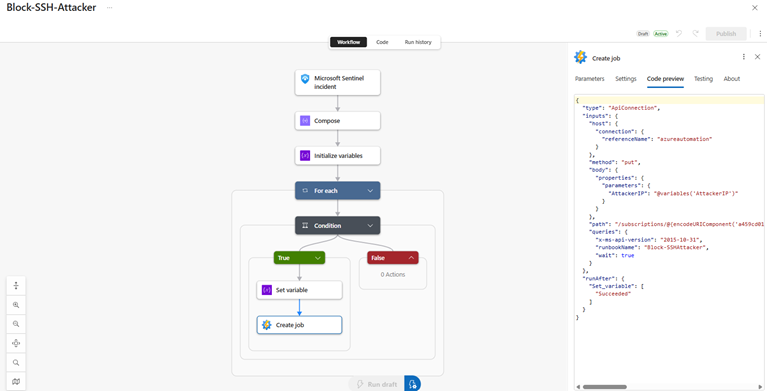
A new inbound rule should now exist that blocks SSH traffic from the attacker’s public IP address.
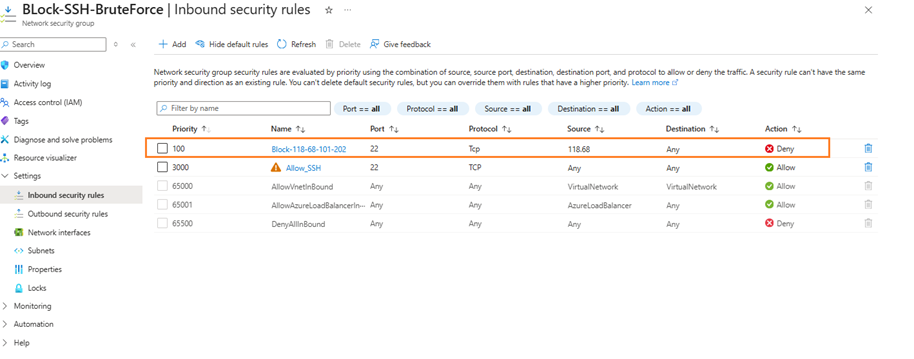
Verify that:
- The rule name was created automatically.
- The source address matches the attacker’s public IP.
- The destination port is 22 (SSH).
- The action is Deny
Part 10: Conclusion
In this lab, we built a complete cloud-native SOAR solution using Microsoft Defender for Cloud, Microsoft Sentinel, Azure Logic Apps, and Azure Automation.
Starting with a simulated SSH brute-force attack using Hydra, Microsoft Defender for Cloud successfully detected the suspicious authentication activity and generated a security alert. Microsoft Sentinel automatically correlated the alert into a security incident, which triggered an Azure Logic App. The Logic App extracted the attacker’s public IP address and invoked an Azure Automation Runbook to update the Azure Network Security Group, automatically blocking any future SSH connections from the malicious source.
Although this demonstration focused on SSH brute-force attacks against a Linux virtual machine, the same architecture can be applied to many real-world security scenarios, including:
- Automatically blocking malicious IP addresses after repeated failed RDP login attempts.
- Isolating compromised virtual machines during malware or ransomware incidents.
- Updating Azure Firewall, Web Application Firewall (WAF), or Application Gateway rules based on security alerts.
- Disabling compromised user accounts after identity-based attacks.
- Triggering notifications through Microsoft Teams, Email, or ServiceNow for security operations.
- Enriching incidents with Microsoft Security Copilot before executing automated response actions.
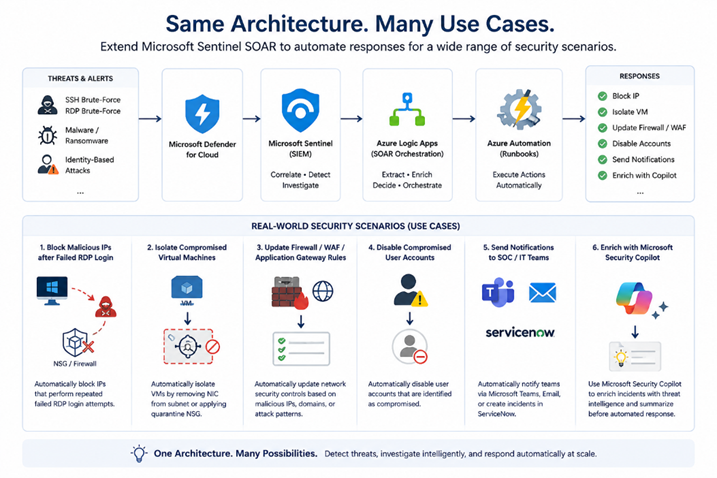
By combining Microsoft’s security ecosystem with cloud-native automation, organizations can significantly reduce response times, eliminate repetitive manual tasks, and improve the consistency of incident response across their Azure environments.
This lab demonstrates that Microsoft Sentinel is not only a powerful SIEM platform for threat detection, but also a flexible SOAR platform capable of orchestrating intelligent, automated security responses at enterprise scale.
“The best security analyst isn’t the fastest one—it’s the one who taught the cloud how to respond automatically.”