Welcome back, fellow Kubernetes travelers! If you are running stateful applications like MySQL on Kubernetes, you know that the threat of data loss is the ultimate risk. A single erroneous kubectl delete namespace command, a subtle logical corruption, or a complete site failure can turn your booming production environment into a “digital graveyard” in milliseconds.
In Part 1, we worked together to build the “theoretical fortress” and laid a solid foundation to guard against these catastrophes. We introduced Portworx Backup—a comprehensive, application-aware data protection solution for Kubernetes—exploring its architecture and key benefits such as centralized management, container-granular control, and infrastructure portability. We also covered the prerequisite checks and detailed the step-by-step installation process to get the control plane up and running.
If you missed that foundational blueprint or need a quick refresher, do not proceed any further until you read Part 1
K8s Data Protection: Application-Consistent Backup with Portworx (Part 1)
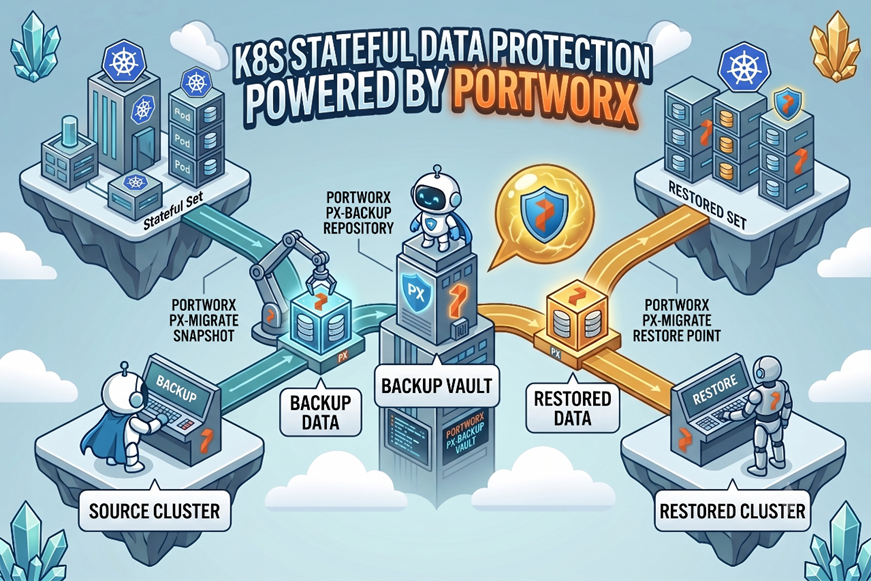
We are done with theory. It’s time for action. Today, we are going to perform a magic trick: Total Data Annihilation and One-Click Resurrection.
In this Part 2, we will guide you through a hands-on, live demo. We will deploy a stateful MySQL database on our K8s cluster, fill it with critical data, and then configure Portworx to back it up securely to an S3 Object Store.
But a backup is useless if you can’t restore it. To prove how effortless disaster recovery can be, we are going to do the unthinkable: We are going to deliberately delete our entire production database namespace. Yes, all of it.
Then, with just a single click in the Portworx Backup UI, we will restore the entire application—application pods, network configurations, and every single bit of stateful data—bringing it back online in a new namespace as if nothing happened.
Are you ready to see real Kubernetes resilience? Let’s initiate the demo!
Setting the Scene: Our Stateful Lab Environment
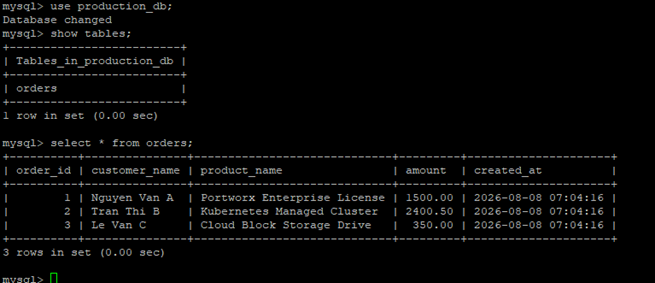
Before we can activate the “Easy Button” for K8s data protection, we need to understand the architecture of our current lab environment. For a proper backup/restore demonstration, we must ensure all pieces are in place: a production workload, high-performance persistent storage, verify the data, and define our off-site backup vault.
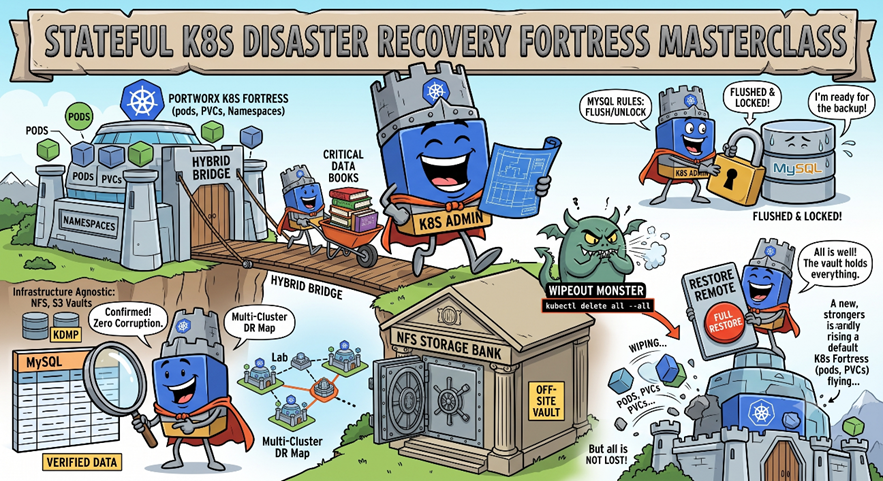
Here is a breakdown of our live demo environment, as visualized in the diagram below (see Figure 1).
1. The Stateful Workload: MySQL
The core of our demonstration is a standard, application-consistent stateful application: MySQL.
- Deployment: A single-replica StatefulSet named
mysql, running within themysql-prodnamespace.
The MySQL StatefulSet must persist its data. To achieve this, it uses a high-performance Portworx Enterprise persistent volume.
- PVC: A PersistentVolumeClaim named
mysql-pvc. - StorageClass: Crucially, this PVC is dynamically provisioned using the
px-csi-dbStorageClass, a high-performance class designed for databases.

2. Local (On-Premises) Backup Target: NFS Storage
To complete the 3-2-1 backup strategy in pure on-premises or air-gapped (network-isolated) environments, where cloud or local object storage services might not be available, we can leverage traditional storage infrastructure. In this lab configuration, we are using an NFS (Network File System) share as our backup repository.
- Type: Network Attached Storage (File-based storage).
- Location: Running on a nearby on-premises server within the same LAN as the K8s cluster.
- Server Info: The IP address of the NFS Server is
10.0.0.10. - Share Path (Export Path): The shared directory on the NFS server is
/data/px-backups.
This NFS Storage location has been mounted into the Portworx Backup infrastructure and configured as a valid target. While Portworx Backup is optimized for object storage, supporting file-based targets like NFS (via Portworx Object Service/Gateway or direct mounting mechanisms) provides maximum flexibility for existing enterprise infrastructure. It is ready to receive our consistent and encrypted data archives.

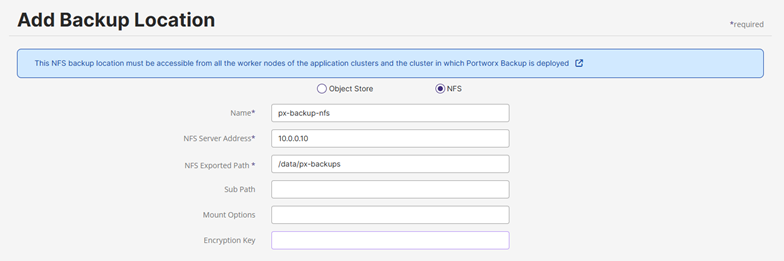
Step 1: Specify NFS Backup Location Details
Navigate to the Add Backup Location screen. On this form, you will define the parameters required for Portworx Backup to connect to and use your NFS share. Refer to the corresponding image for UI element locations.
Crucial Prerequisite Verification: Before filling out the form, pay close attention to the informational blue box shown in the image. You must absolutely verify that your NFS share is configured with rw (read-write) and no_root_squash permissions. Furthermore, this share must be accessible (routable) from the Internal IP addresses of all worker nodes in both the application cluster (containing the stateful workload) and the cluster where Portworx Backup control plane is deployed.
- Choose Location Type: Confirm that the NFS radio button is selected (as indicated by the filled circle in the image).
- Enter a Name (Required): Provide a unique, descriptive internal name for this backup location. This name identifies the location within the Portworx interface (e.g.,
OnPrem-NFS-VaultorNFS-Archive). - Enter NFS Server Address (Required): Provide the technical address of the machine hosting the NFS service. For your lab setup discussed previously, this must be the Internal/Private IP Address of your NFS Server (e.g.,
10.0.0.10) that your Kubernetes nodes can reach. Alternatively, use a resolvable FQDN if internal DNS is configured. - Enter NFS Exported Path (Required): Enter the exact, absolute case-sensitive directory path shared by the NFS server, as defined in its
/etc/exportsfile (e.g.,/data/px-backups). - Enter Sub Path (Optional): If you wish to organize backups within a specific subdirectory under the Exported Path rather than directly in the base folder, specify the subdirectory name here. Leave blank if not required.
- Enter Mount Options (Optional): Enter comma-separated custom mount arguments if required by your NFS server environment or to optimize network performance (e.g.,
hard,timeo=600,retrans=2). Portworx KDMP may append internal default options needed for proper operation. Default settings apply if left blank.
Encryption Key (Optional/Conditional): If you intend to encrypt the data stored at this backup location, select an existing encryption key or provide a new one using the input field highlighted with the purple border in the image. Consult Portworx documentation regarding pre-creating encryption keys.
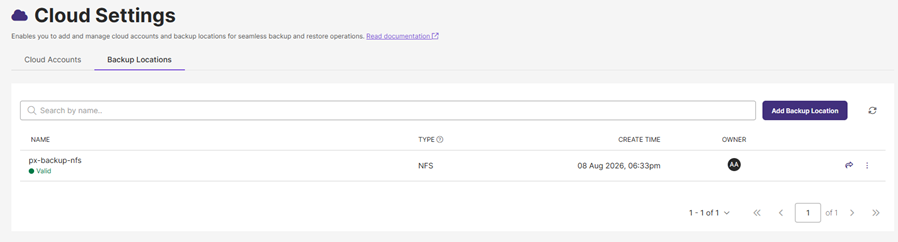
Validation: Upon clicking the final action button (typically located below the visible screen area), Portworx immediately initiates a validation process. Portworx will attempt to mount the defined NFS share to verify connectivity and mandatory no_root_squash and rw permissions; upon successful verification, the backup location will appear in the list with a status of “Valid”.
Step 2: Create Application-Consistent Backup Rules for MySQL
Prior to initiating the backup job, Portworx strongly recommends establishing specific rules to run both before and after the backup operation. These rules ensure logical data consistency for the MySQL database by properly flushing data to disk and managing I/O locks.
Here is the exact procedure to create these foundational rules within the Portworx Backup interface, as per the documentation. Modifying the username and password in the commands below to match your specific Kubernetes environment configuration is critical.
1. Create a Pre-exec Backup Rule for MySQL
Before a MySQL backup occurs, Portworx recommends flushing certain data, such as database tables and logs, to disk. This step ensures that the captured backup remains consistent upon recovery. Additionally, it is essential in MySQL to lock the tables, preventing new I/O transactions from attempting to add records during the backup process. Failing to do so can lead to an inconsistent database state.
To achieve an application-consistent snapshot, the FLUSH TABLES WITH READ LOCK command is utilized in a pre-backup rule. This command locks the tables with a global read lock, allowing Portworx to capture a reliable snapshot.
Creation Steps:
- Navigate from the home page to Settings > Rules > Add New.
- In the Add Rule window, populate the following specific details:
- Rule name: Add a distinctive name for your backup rule.
- Pod Selector: Add the following app label to target the MySQL pods:
app=mysql
- Container: This field is mandatory if you are using mTLS with the Linkerd service mesh; provide the container name. Otherwise, leave this field blank.
- Action: Add the following action, ensuring you modify the username and password:
For MySQL version 9.3 and above:
mysql --user=root --password=$MYSQL_ROOT_PASSWORD -Bse 'FLUSH TABLES WITH READ LOCK;'For MySQL version below 9.3:
mysql --user=root --password=$MYSQL_ROOT_PASSWORD -Bse 'FLUSH TABLES WITH READ LOCK;system ${WAIT_CMD};'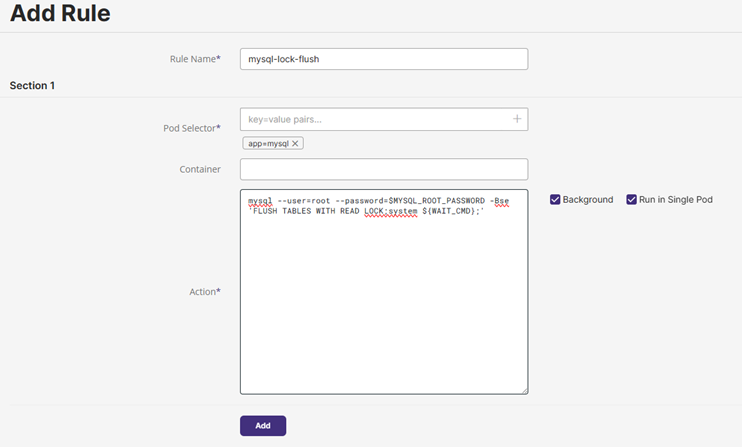
2. Create a Post-exec Backup Rule for MySQL
Just as Portworx Backup performed a flush and lock on the MySQL data before the backup, it must also run an UNLOCK command afterward. This essential action instructs the database to release the global read lock and resume normal operations.
It can also be highly beneficial to run FLUSH LOGS. This command rotates the logs and updates their sequence number. Flushing logs is particularly useful when you require a clear, unambiguous distinction between logs created before and after a specific backup event occurs.
Creation Steps:
- Navigate from the home page to Settings > Rules > Add New.
- In the Add Rule window, populate the following specific details:
- Rule name: Add a distinctive name for your backup rule.
- Pod Selector: Add the following app label to target the MySQL pods:
app=mysql
- Container: This field is mandatory if you are using mTLS with the Linkerd service mesh; provide the container name. Otherwise, leave this field blank.
- Action: Add the following action, ensuring you modify the username and password:
mysql --user=root --password=$MYSQL_ROOT_PASSWORD -Bse 'FLUSH LOGS; UNLOCK TABLES;'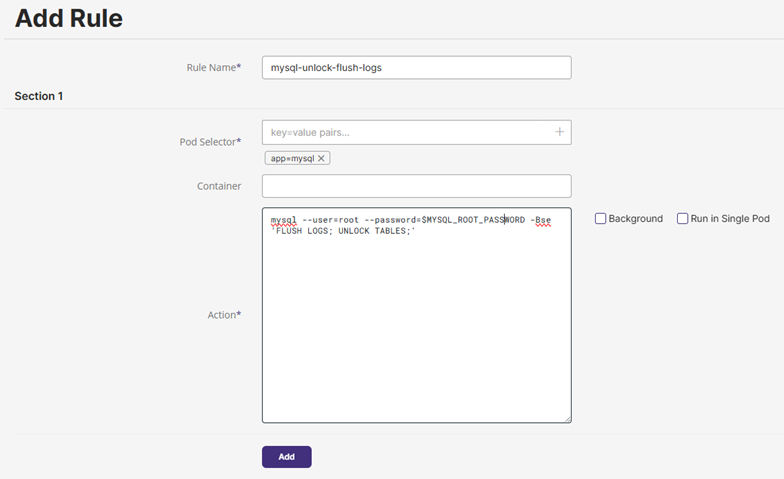
Step 3: Create a Manual Backup for MySQL
Once you have established the theoretical framework and laid the groundwork in Steps 1 and 2, you are ready to put your Portworx Backup installation to the test. Step 3 focuses on executing a manual backup of your MySQL application, ensuring that your critical data is securely protected.
Prerequisites
Before you proceed with creating a manual backup, ensure that you have fulfilled the following prerequisites:
- Application Cluster Added to Portworx Backup: Your Kubernetes application cluster, where the stateful MySQL application is running, must be successfully added to the Portworx Backup console. This cluster contains the namespaces and resources you intend to protect.
- Configured Backup Location: You must have a configured and validated backup location. This location can be either an object store (like AWS S3, Google Cloud Storage, or Azure Blob Storage) or an NFS share. This location will serve as the repository for storing your application-consistent backup data.
Executing the Manual Backup
To create an immediate, manual backup of your stateful MySQL application, follow these step-by-step instructions:
- Log in to the Portworx Backup web console: Access the Portworx Backup UI through your web browser.
- Navigate to Clusters: From the home page, click on the Clusters icon located in the left navigation pane. This will display a list of all Kubernetes clusters managed by Portworx Backup.
- Select Your Application Cluster: Choose the specific application cluster that contains the MySQL namespace you want to back up. This action will redirect you to the cluster’s dashboard.
- Go to the Applications Tab: Within the cluster’s dashboard, navigate to the Applications tab.
- Identify the Namespace: Ensure the NS (Namespaces) tab is selected. This tab lists all the namespaces available within the cluster.
- Select the Namespace to Back Up: Find the namespace that houses your MySQL application (e.g., mysql-prod) and select it by clicking its checkbox.

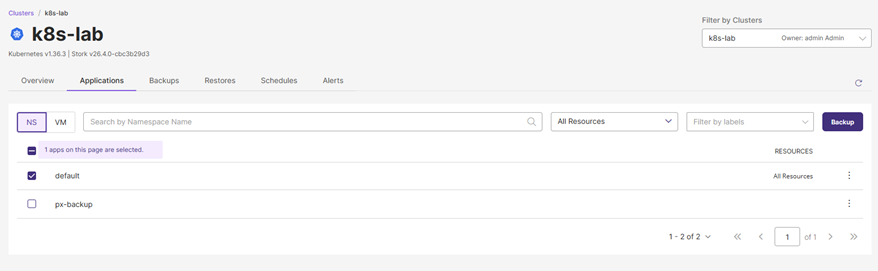
- Initiate Backup: Click the Backup button. The Create Backup window will appear.
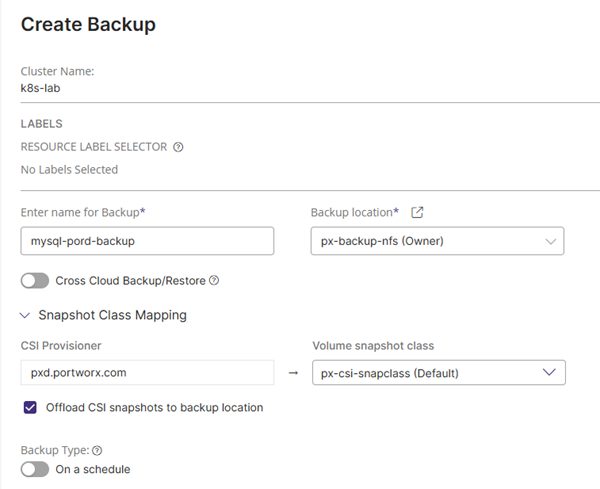
- Configure Backup Details: In the Create Backup window, provide the following specific information:
- Enter name for Backup: Enter a relevant and descriptive name for this specific backup job. A well-named backup will help you easily identify it for future reference or restore operations (e.g., mysql-manual-backup-consistent).
- Backup location: Search for and select the previously configured and validated backup location (object store or NFS) where you want to store this backup. You can use a keyword to quickly filter the list by name.
- Cross Cloud Backup/Restore: Portworx Backup includes a Cross Cloud Backup/Restore toggle button.
- Enabled: When enabled, this option uses the KDMP driver to trigger a direct KDMP backup. This is particularly useful if you intend to restore the backup in a different cloud environment. Note that the Snapshot Class Mapping option will be disabled if this is enabled.
- Disabled (Default): This is the default setting. When disabled, the Snapshot Class Mapping option will be visible, allowing you to manually map volume snapshot classes. We will proceed with this option for our manual MySQL backup.
- Snapshot Class Mapping: This option is crucial for ensuring proper snapshot creation. It displays:
- CSI Provisioner: A list of the CSI provisioners associated with the applications in the selected namespace.
- Volume snapshot class: A list of available volume snapshot classes for each provisioner, including the default class. Ensure you select the appropriate class for your storage.
- Offload CSI snapshots to backup location: This option allow you to offload the CSI snapshot class to the specified backup location (S3 compliant/other object stores or NFS backup location). Enabling this option helps ensure comprehensive data protection.
- Backup type: This setting allows you to choose between running a single backup or establishing a schedule.
- Enabled (Manual Backup): To create an immediate manual backup, ensure this option is Enabled. This configuration will execute the backup job as soon as you click the Create button.
- Disabled (Scheduled Backup): If you disable this, you will see a Choose a Schedule Policy option, allowing you to select a predefined schedule for automated, recurring backups. For our demo, we are focusing on a manual backup, so we will keep this enabled.
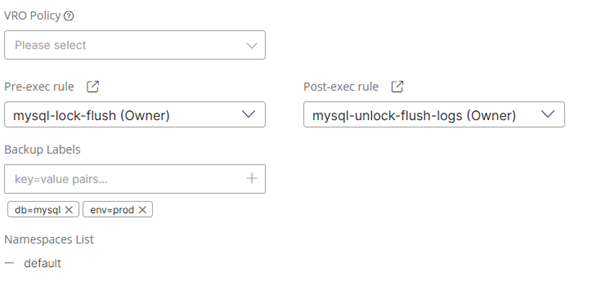
- Pre-exec rule: Select the predefined pre-exec rule for MySQL from the drop-down list. This rule must be selected to flush pending data and lock the database tables before the snapshot is taken, ensuring logical consistency. (Refer to Step 2 for creating this rule).
- Post-exec rule: Select the predefined post-exec rule for MySQL from the drop-down list. This rule will release the database locks after the snapshot is taken. (Refer to Step 2 for creating this rule).
- Backup Labels: Add any custom labels you want to associate with this backup for organizational or filtering purposes.
- NAMESPACES LIST: Verify that the correct namespace(s) selected for backup are listed here.
Create Backup: After you have populated all the fields correctly in the Create Backup window, click the Create button.
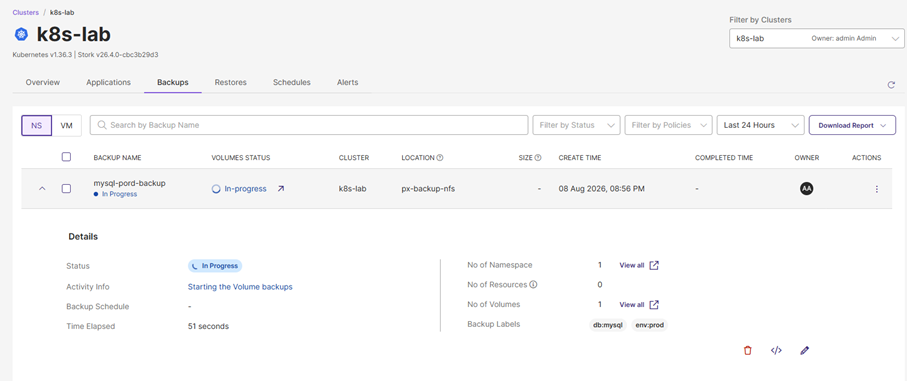
Immediately after you click the Create button, Portworx Backup initiates the manual backup job sequence. To verify that the task is actively running, you can navigate to the Backups tab within the console The ‘VOLUMES STATUS’ also reflects an ‘In-progress’ wheel.
You can also confirm the details such as the target ‘k8s-lab’ cluster and the ‘px-backup-nfs’ location
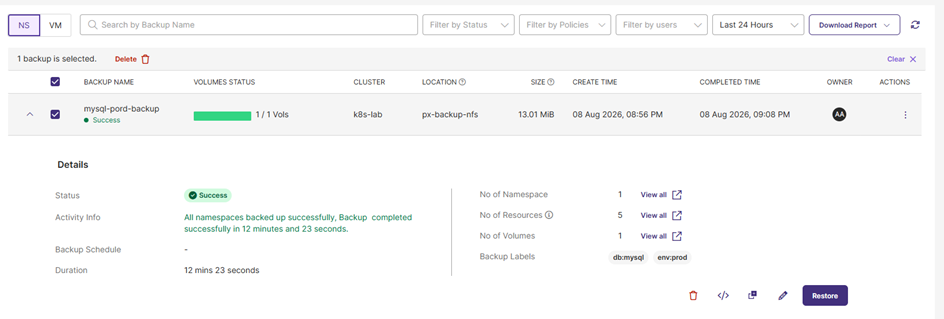
Successful backup for the ‘mysql-pord-backup’ job. One volume (13.01 MiB) was protected in 12 minutes and 23 seconds, total status “Success.”
Step 4: Validate Disaster Recovery – Deletion, Verification, and Full Restore
Moving from preparation to validation, this step puts our “NFS Fortress” to the test in a true disaster recovery simulation. We will intentionally destroy our active MySQL application and utilize Portworx Backup to perform a complete recovery to the original cluster state.
Portworx Backup provides Full Restore functionality, which replaces all namespaces and their associated resources (PVs, StatefulSets, Services, ConfigMaps, etc.) from the backup to the destination cluster.
Part 1: Simulate the Disaster (Resource Deletion)
To simulate a total loss of the application, we will execute a command that destroys all Kubernetes resources within the target namespace.
Execute the Deletion Command:
kubectl delete all --all -n defaultVerify the Namespace is Empty:

Part 2: Perform Full Restore using Portworx Backup UI
Execute the following steps within the Portworx Backup web console, accurately following the procedure from the Portworx documentation.
Procedure Steps:
1. Log in to Portworx Backup web console: Access the UI using your credentials.
2. Navigate to Clusters: From the left navigation pane, click the Clusters icon (resembling stacked hexagons).
3. Select the Source Cluster: On the Clusters page, locate and click the application cluster (e.g., k8s-lab) from which you took the backup. The system displays the detailed application cluster page.
4. Filter for Namespace Backups: Click the Backups tab, and select the NS sub-tab to view namespace-level backups.
- Tip: Use the timeframe filter (top right dropdown) to list backups based on the required timeline (e.g., Last 24 Hours, 1 week, or Custom Timeframe).
5. Locate your MySQL Backup: Find the required namespace backup (e.g default)
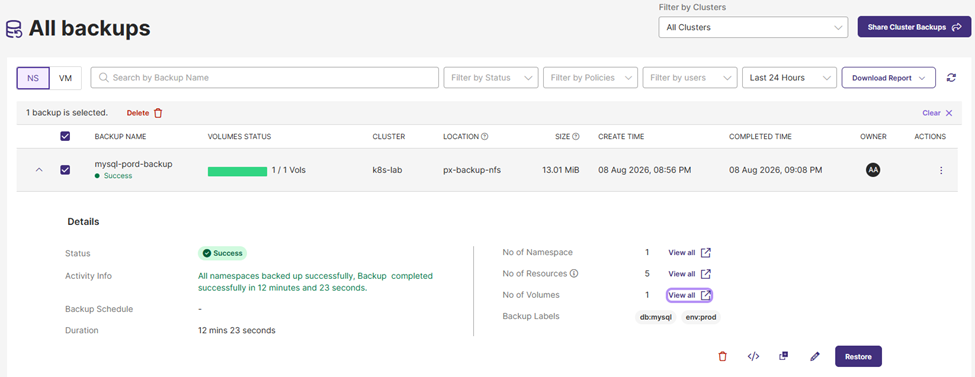
6. Initiate Restore Action: Click the Actions icon (the three vertical ellipses) for that required NS backup, and select Restore from the list of available actions. The system displays the Restore Options page.
7. Select Full Restore: When prompted to select the restore option, choose the Full Restore option. (Avoid Namespace or Resource Restore options for this total DR scenario).
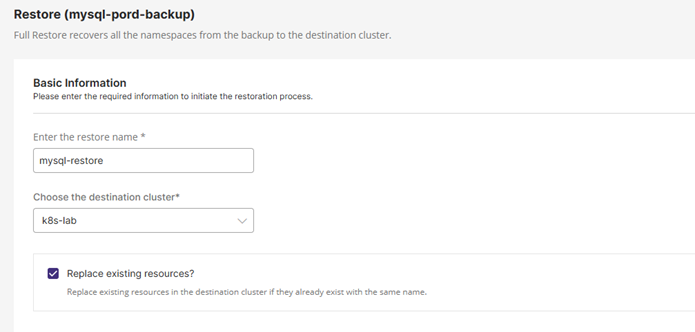
8. Specify Restore Details: The system displays the main Restore (Backup) page. Accurately provide the following information:
- Enter name for the restore: Enter a unique name for this restore operation (e.g., mysql-lab-full-restore). This name identifies the restore operation in the Restore tab.
- Choose the destination cluster: Select the destination cluster where you want to restore the backup (e.g., the same k8s-lab cluster).
- Replace existing resources?:
- Guidance for this simulation: Since we just deleted all resources in Part 1, the namespace is clean. However, to guarantee a “clean slate” matching the backup data exactly, Select this checkbox to replace existing resources. Portworx will overwrite any remnant resources with the latest backup data.
9. Execute Restore: Click the Restore button.
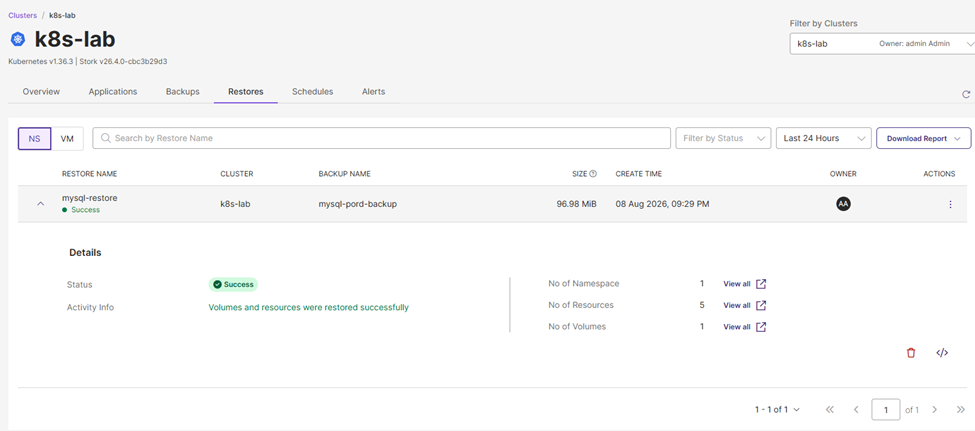
– The job status is clearly marked as ‘Success’, with a green checkmark next to the restore name and an expanded detailed view showing a green badge under ‘Status’. The job processed 96.98 MiB of data from the source backup ‘mysql-pord-backup’.
-The expanded details section explicitly confirms under ‘Activity Info’ that ‘Volumes and resources were restored successfully.‘ Looking at the counts on the right side of the details pane, this operation successfully recovered 1 persistent volume and a total of 5 Kubernetes resources within 1 namespace
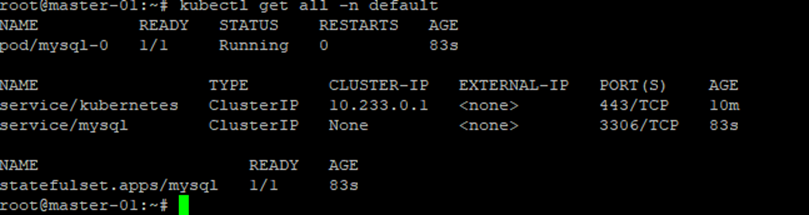
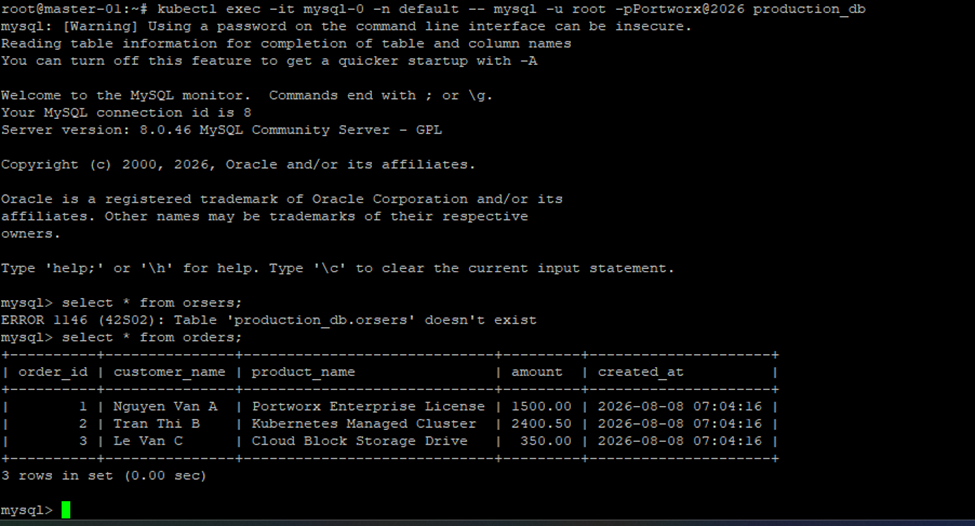
After restoring, verify namespace resources using kubectl and query data directly inside the MySQL pod.
Step 5: The Stateful K8s Fortress – Masterclass Journey Complete
Congratulations on completing your Stateful Kubernetes Fortress Masterclass! You hold the definitive blueprint for data protection. This journey constructs a proactive disaster recovery lifecycle around your stateful applications. Reflect on this powerful masterclass summary:
- Hybrid Infrastructure Bridging: You learned to connect modern elastic K8s with traditional infrastructure, successfully configuring an NFS Storage share as a robust, off-site backup vault with crucial network and permission tuning.
- True Application Consistency: You mastered the defining moment of database protection, implementing mandatory MySQL Backup Rules (
FLUSH/UNLOCK TABLESframework) to ensure logical database integrity with zero data corruption upon recovery. - Disaster-Proof Confidence: You didn’t just back up; you completed the proactive DR lifecycle: Manual Backup $\rightarrow$ Disaster Simulation (Namespace Wipeout) $\rightarrow$ Full Restore of entire namespaces and their persistent volumes.
- Proven Data Verification: You learned to verify the data is accurate by running direct secure MySQL queries within the restored pod.
You walk away with proven disaster confidence, powered by the unique, proactive features of Portworx Backup:
- Kubernetes-Native Understanding: Portworx Backup understands Kubernetes resources (Namespaces, PVCs, StatefulSets, Deployments, Services, ConfigMaps, etc.), not just storage blocks. It backs up the complete application, both data and configuration.
- Application Consistency Framework: The robust Rule Framework (Pre/Post hooks) allows for seamless integration with any database (MySQL, PostgreSQL, Cassandra, MongoDB…) ensuring backups are always in a healthy state for recovery without post-restore repair.
- Infrastructure Agnostic & Flexible: Supports diverse backup locations (NFS, S3, Azure Blob, Google Cloud Storage, MinIO) and technology like KDMP (Kubernetes Data Management Platform) for moving data across storage classes and cloud providers.
- Comprehensive Multi-Cluster Disaster Recovery: Provides a single centralized web interface to manage automated, policy-based backup/restore across multiple Kubernetes clusters from on-prem to cloud.